When most people think of training their abs and core, they think of crunches, sit-ups, and similar mainline ab exercises.
And while there’s nothing wrong with these per se, they aren’t the end all be all of training your core. There are actually many other core exercises you can do to strengthen your obliques, abdominals, and surrounding muscles, and one of the most underrated is the Pallof press.
The Pallof press is an exercise that involves pressing a taut resistance band in front of your body, and flexing your core, shoulder, and arm muscles to prevent the band from pulling you off balance.
It trains your muscles to stabilize your body in a natural athletic position, (as opposed to something like crunches, which are less practical).
In other words, there’s probably more carryover from the Pallof press to exercises like the squat, deadlift, and overhead press and sports that require rapid rotation (most of them), than there is from traditional ab exercises like crunches.
In this article, you’ll learn everything you need to know about the Pallof press including what the Pallof press is, what muscles are worked by the Pallof press, how to do the Pallof press with proper form, and the best Pallof press variations including the half-kneeling Pallof press, cable Pallof press, kneeling Pallof press, and more.
What Is the Pallof Press?
The Pallof press is an “anti-rotational exercise” that was invented by physical therapist John Pallof to train the muscles of your core and lower back.
There are many variations of the Pallof press, but the most common is the Pallof press with band, or banded Pallof press.
While it’s a great exercise for anyone who wants to train their core and six-pack, it’s particularly useful for athletes. That’s because the banded Pallof press builds the type of core strength and stability you need to twist and turn at speed without getting injured (at least, that’s the theory).
The Pallof Press: Muscles Worked
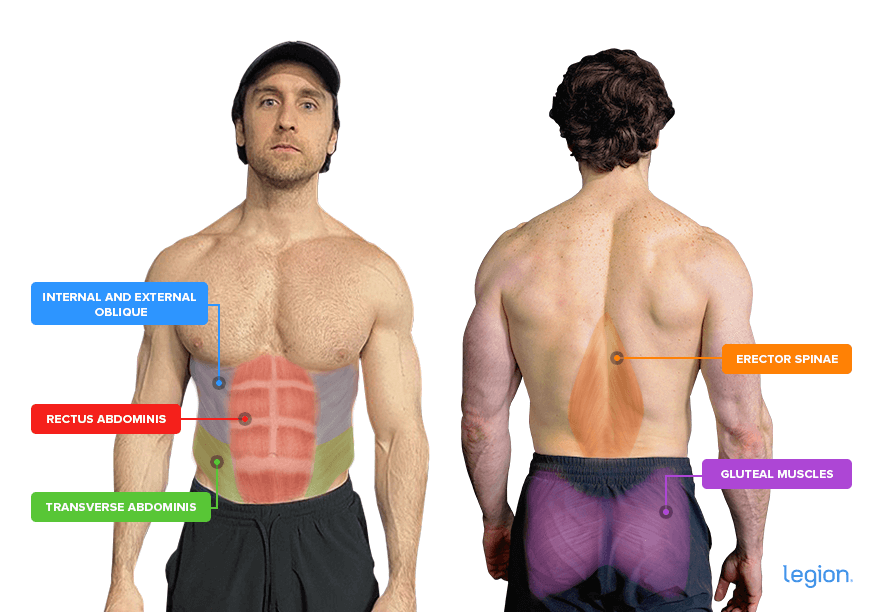
One of the main benefits of the Pallof press is that it works almost all the muscles of the core.
Specifically, the muscles worked by the Pallof press are the . . .
- Rectus abdominis
- Internal and external obliques
- Transverse abdominis
- Erector spinae
. . . and it also trains the glutes to a smaller degree, too.
Here’s how these muscle look on your body:
How to Pallof Press
The best way to learn proper Pallof press form is to break the exercise up into three phases: set up, press, retract.
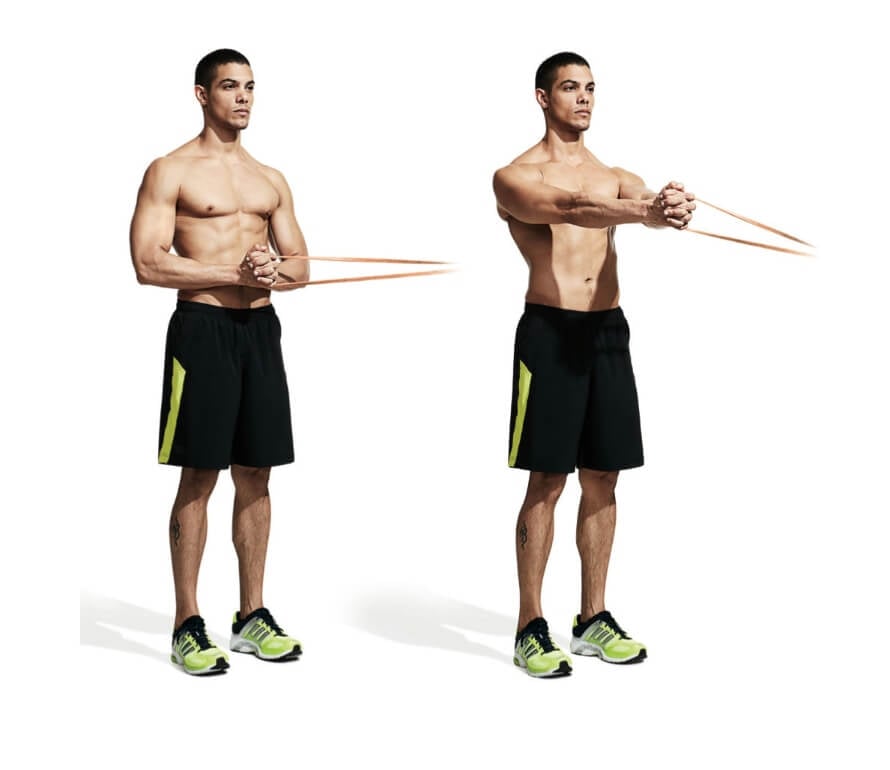
Step #1: Set Up
Attach a resistance band to something sturdy (a squat rack works well) at chest height, then grab the free end with both hands and stand with your right shoulder facing the point where the band is attached (the anchor point). Interlock your fingers around the band, hold the band close to your chest, then step away from the anchor point until there’s tension in the band.
Step #2: Press
Stand up straight with your feet shoulder-width apart and bend your knees slightly. Squeeze the band in your palms, pull your shoulder blades back and down, and extend your arms in front of your chest until your elbows are locked. Flex your abs as hard as you can to prevent the band from rotating your body toward the anchor point.
Step #3: Retract
Keeping your abs flexed, your shoulder blades back and down, and without twisting your torso, bring your hands back to your chest by bending your elbows.
Once you’ve completed the desired number of reps, switch sides and repeat the process with your left side.
The Best Pallof Press Variations
1. Half-Kneeling Pallof Press
If you’re new to the Pallof press, the half-kneeling Pallof press is a great place to start. That’s because taking a half-kneeling stance helps prevent your hips from rotating, which makes the exercise easier.
How to:
- Attach a resistance band to something sturdy (a squat rack works well) at hip height.
- Grab the free end with both hands and stand with your right shoulder facing the point where the band is attached (the anchor point).
- Interlock your fingers around the band, hold the band close to your chest, then step away from the anchor point until there’s tension in the band.
- Kneel down on the floor (as if doing a split squat) with the knee closest to the anchor point touching the floor.
- Squeeze the band in your palms, pull your shoulder blades back and down, and extend your arms in front of your chest until your elbows are locked.
- Flex your abs as hard as you can to prevent the band from rotating your body toward the anchor point.
- Without twisting your torso, bring your hands back to your chest by bending your elbows.
- Once you’ve completed the desired number of reps, switch sides and repeat the process with your left side.
2. Cable Pallof Press
The biggest benefit of the cable Pallof press (sometimes also called the “cable core press”) is it’s easy to add weight to. This allows you to better implement progressive overload, which is the most important driver of muscle growth.
How to:
- Set the pulley on a cable machine to chest height and connect the handle attachment.
- Grab the handle with both hands and stand with your right shoulder facing the cable machine.
- Interlock your fingers around the handle, hold the handle close to your chest, then step away from the cable machine until there’s tension in the cable.
- Stand up straight with your feet shoulder-width apart and maintain a slight bend in your knees.
- Squeeze the handle in your palms, pull your shoulder blades back and down, and extend your arms in front of your chest until your elbows are locked.
- Flex your abs as hard as you can to prevent the cable from rotating your body toward the cable machine.
- Without twisting your torso, bring your hands back to your chest by bending your elbows.
- Once you’ve completed the desired number of reps, switch sides and repeat the process with your left side.
3. Kneeling Pallof Press
The kneeling Pallof press (also known as the “tall kneeling Pallof press”) is a more advanced version of the standard Pallof press. In the kneeling Pallof press you use your knees as your base of support instead of your feet, which increases the instability of the exercise and means your core muscles have to work harder to prevent your body from rotating.
How to:
- Attach a resistance band to something sturdy (a squat rack works well) at hip height.
- Grab the free end with both hands and stand with your right shoulder facing the point where the band is attached (the anchor point).
- Interlock your fingers around the band, hold the band close to your chest, then step away from the anchor point until there’s tension in the band.
- Kneel down on the floor so that both knees are on the floor and fully extend your hips so that your knees, hips, and head are in a straight line.
- Squeeze the band in your palms, pull your shoulder blades back and down, and extend your arms in front of your chest until your elbows are locked.
- Flex your abs as hard as you can to prevent the band from rotating your body toward the anchor point.
- Without twisting your torso, bring your hands back to your chest by bending your elbows.
- Once you’ve completed the desired number of reps, switch sides and repeat the process with your left side.
4. Pallof Press with Rotation
The Pallof press with rotation is a great variation to progress to once you’ve mastered the standard Pallof press and the kneeling Pallof press. In the Pallof press with rotation you not only have to prevent your body rotating toward the anchor point, you have to rotate your body away from the anchor point, which makes it considerably more taxing on the core muscles.
How to:
- Attach a resistance band to something sturdy (a squat rack works well) at chest height.
- Grab the free end with both hands and stand with your right shoulder facing the point where the band is attached (the anchor point).
- Interlock your fingers around the band, hold the band close to your chest, then step away from the anchor point until there’s tension in the band.
- Stand up straight with your feet shoulder-width apart and maintain a slight bend in your knees.
- Squeeze the band in your palms, pull your shoulder blades back and down, and extend your arms in front of your chest until your elbows are locked.
- Using your core muscles, rotate your torso away from the anchor point as far as you can (normally 20-to-45 degrees), then rotate back so that your feet, hips, and shoulders are facing in the same direction again.
- Bring your hands back to your chest by bending your elbows.
- Once you’ve completed the desired number of reps, switch sides and repeat the process with your left side.
5. Split Stance Pallof Press
In the split stance Pallof press, you place the majority of your body weight on your forward leg. This decreases your stability and means your core muscles have to work harder to prevent your torso from rotating.
How to:
- Attach a resistance band to something sturdy (a squat rack works well) at chest height.
- Grab the free end with both hands and stand with your right shoulder facing the point where the band is attached (the anchor point).
- Interlock your fingers around the band, hold the band close to your chest, then step away from the anchor point until there’s tension in the band.
- Step backward with your foot that’s closest to the anchor point and place the majority of your body weight in your lead leg, then bend both knees slightly.
- Squeeze the band in your palms, pull your shoulder blades back and down, and extend your arms in front of your chest until your elbows are locked.
- Flex your abs as hard as you can to prevent the band from rotating your body toward the anchor point.
- Without twisting your torso, bring your hands back to your chest by bending your elbows.
- Once you’ve completed the desired number of reps, switch sides and repeat the process with your left side.
6. Single-Leg Pallof Press
Performing the Pallof press on one foot decreases your stability. This means in the single-leg Pallof press your core muscles have to work very hard to prevent your torso from rotating. (That said, it also reduces how much resistance you can use, which could reduce the effectiveness of the exercise if it’s too difficult for you to balance).
How to:
- Attach a resistance band to something sturdy (a squat rack works well) at chest height.
- Grab the free end with both hands and stand with your right shoulder facing the point where the band is attached (the anchor point).
- Interlock your fingers around the band, hold the band close to your chest, then step away from the anchor point until there’s tension in the band.
- Stand up straight, then lift the leg closest to the anchor point off the floor by bringing your knee up in front of you.
- Squeeze the band in your palms, pull your shoulder blades back and down, and extend your arms in front of your chest until your elbows are locked.
- Flex your abs as hard as you can to prevent the band from rotating your body toward the anchor point.
- Without twisting your torso, bring your hands back to your chest by bending your elbows.
- Once you’ve completed the desired number of reps, switch sides and repeat the process with your left side.
7. Pallof Press Iso Hold
In the Pallof press iso hold you have to hold the most difficult part of the Pallof press for longer than normal (isometrically, hence the name). This taxes your muscles in a slightly different way, and improves the endurance of your core, lower back, and glutes.
How to:
- Attach a resistance band to something sturdy (a squat rack works well) at chest height.
- Grab the free end with both hands and stand with your right shoulder facing the point where the band is attached (the anchor point).
- Interlock your fingers around the band, hold the band close to your chest, then step away from the anchor point until there’s tension in the band.
- Stand up straight with your feet shoulder-width apart and maintain a slight bend in your knees.
- Squeeze the handle in your palms, pull your shoulder blades back and down, and extend your arms in front of your chest until your elbows are locked.
- Flex your abs as hard as you can to prevent the band from rotating your body toward the anchor point, and hold the position for 5-to-20 seconds.
- Without twisting your torso, bring your hands back to your chest by bending your elbows.
- Once you’ve completed the desired number of reps, switch sides and repeat the process with your left side.