
Below, you’ll find four pull day workouts: a men's pull workout, a women's pull workout, a dumbbell-only pull workout, and a machine pull workout. Each includes sets, reps, rest periods, and demonstrations to help you perform every exercise.
The Best Pull Day Workout Routine for Men
Barbell Deadlift: 3 sets | 4–6 reps | 2–3 min rest
Chest-Supported Seated Machine Row: 3 sets | 6–8 reps | 2–3 min rest
Pull-Up: 3 sets | 6–8 reps | 2–3 min rest
Cable Pullover: 2 sets | 8–10 reps | 1–2 min rest
Machine Rear Delt Fly: 2 sets | 8–10 reps | 1–2 min rest
Bayesian Cable Curl: 3 sets | 8–10 reps | 1–2 min rest
| Workout statistics | Total |
|---|---|
| Working sets | 16 |
| Reps | 104–136 |
| Effective reps | ~48–64 |
| Estimated duration | ~35–50 min |
An "effective rep" is a repetition performed when a muscle is already within about 5 reps of failure, when all or most of the fibers in the muscle are activated. This is a more accurate and precise way of tracking volume than counting sets or tonnage (weight x reps x sets).
You start with the deadlift while you're fresh, because it's the most physically and technically demanding exercise and it trains the most muscles simultaneously: your glutes, hamstrings, lats, spinal erectors, traps, and rear delts all contribute.
Then, you do pull-ups and rows to train your lats, biceps, mid- and lower-traps, mid-back, and rear delts. Then you finish with a few isolation exercises: pullovers for your lats, machine rear delt flyes for your rear delts, and Bayesian cable curls for your biceps.
The Best Pull Day Workout for Women
Barbell Romanian Deadlift: 3 sets | 6–8 reps | 2–3 min rest
Chest-Supported Seated Machine Row: 3 sets | 6–8 reps | 2–3 min rest
Close-Grip Lat Pulldown: 3 sets | 6–8 reps | 2–3 min rest
Machine Rear Delt Fly: 3 sets | 8–10 reps | 1–2 min rest
Bayesian Cable Curl: 3 sets | 8–10 reps | 1–2 min rest
| Workout statistics | Total |
|---|---|
| Working sets | 15 |
| Reps | 102–132 |
| Effective reps | ~45–60 |
| Estimated duration | ~30–50 min |
You'll often see dedicated "pull day workouts for women" online, and it's easy to get the impression that women should train very differently from men. This isn't true.
Women's muscles work the same way men's do, and women should train according to the same scientific principles: using effective pulling exercises with proper technique, taking sets close to failure for sets of around ~4-to-10 reps, and striving to add weight to exercises over time.
That said, most women typically want to prioritize building their glutes and shoulders and care less about developing their lats and biceps, and men typically want to prioritize building their biceps, lats, and shoulders and care less about their glutes, which does slightly change what exercises you do in your pull workouts.
For most women, one dedicated pull day per week is enough. If you train four or five days per week, you’ll usually include pulling exercises on another day as well, but that second session doesn’t need to be a pull-only workout.
I've worked with tens of thousands of women through my fitness program for women, Thinner Leaner Stronger, my other books, and my body transformation coaching program. Most want strong, defined, "toned" backs and arms, but worry about getting "bulky."
The reality is that it's exceptionally difficult (basically impossible) for your back, biceps, and traps to get "too big" if you follow the pull workouts in this article.
The reason men's muscles get significantly bigger when they follow this workout plan is that they have 15-20 times more testosterone flowing through their veins than you do.1
So unless you start taking steroids to alter your physiology to mirror that of a man, your back, arms, and traps will never "blow up" in the same way.23
If you want more proof, here are a few coaching clients who built noticeably stronger, more defined “pull muscles” in just a few months using this exact approach. I don't think anyone would consider them "bulky:"
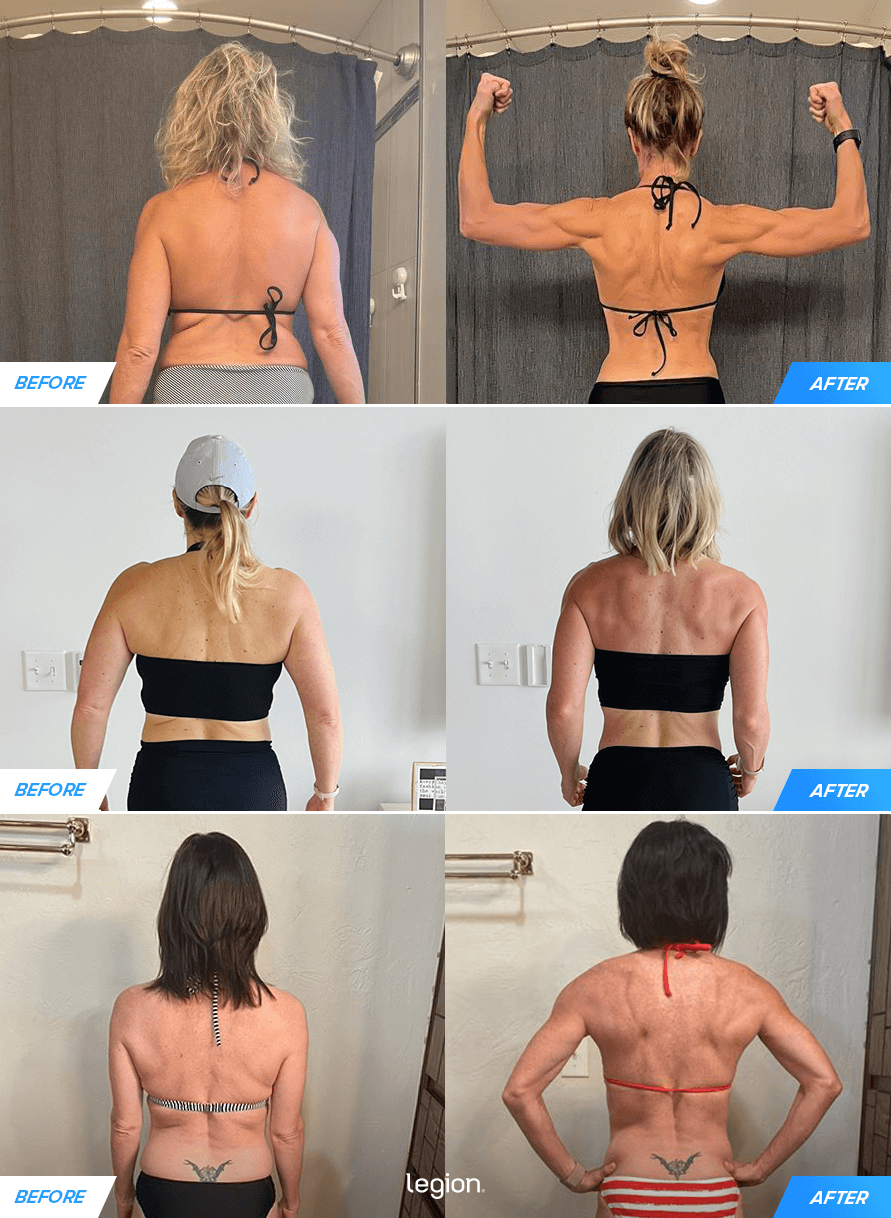
See the coaching-client transformations
Pull Day Dumbbell Workout
One-Arm Dumbbell Row: 3 sets | 6–8 reps | 2–3 min rest
Dumbbell Rear Delt Fly: 3 sets | 8–10 reps | 1–2 min rest
Incline Dumbbell Curl: 3 sets | 8–10 reps | 1–2 min rest
| Workout statistics | Total |
|---|---|
| Working sets | 9 |
| Reps | 66–84 |
| Effective reps | ~27–36 |
| Estimated duration | ~20–30 min |
This version needs dumbbells and a sturdy bench. The row trains your lats, while the rear delt fly and curl train your rear delts and biceps.
While dumbbells are a fine stopgap if you don't have access to machines, cables, and barbells, you'll quickly reach a point where it's hard to progress on certain exercises. And, as you can see, the number of exercises you can do with just dumbbells is pretty limited.
Pull Day Machine Workout
Chest-Supported Seated Machine Row: 4 sets | 6–8 reps | 2–3 min rest
Lat Pulldown: 4 sets | 6–8 reps | 2–3 min rest
Machine Rear Delt Fly: 3 sets | 8–10 reps | 1–2 min rest
Machine Curl: 3 sets | 8–10 reps | 1–2 min rest
| Workout statistics | Total |
|---|---|
| Working sets | 14 |
| Reps | 96–124 |
| Effective reps | ~42–56 |
| Estimated duration | ~30–45 min |
You start with rows and pulldowns to train your lats, biceps, mid- and lower-traps, mid-back, and rear delts. Then you finish with machine rear delt flyes for your rear delts and machine curls for your biceps.
How to Fit a Pull Workout into Your Week
A pull day workout is a training session built around “pulling” movements—exercises where you pull weight toward your body or off the floor.
Most pull days revolve around compound exercises like deadlifts, rows, and pull-ups or lat pulldowns. These movements train many muscles at once and let you lift heavy weights safely and efficiently.
Good pull workouts also include one or two isolation exercises to train muscles compound lifts don’t emphasize as well—like rear lateral raises for the rear delts or curls for the biceps, and often some isolation exercises to further train the lats.
Most people do a pull workout as part of a push pull legs (PPL), upper lower (UL), or push pull legs upper lower (PPLUL) split, like this:
- Push Pull Legs (PPL): One push day, one pull day, one leg day.
- Upper Lower (UL): One or two upper-body days (usually emphasizing push or pull), and one or two lower-body days.
- PPLUL: A mix of both—push, pull, legs, plus upper and lower days.
Which routine you choose mostly depends on how often you want to train:
- If you train 3 days per week, a PPL split works very well.
- If you train 4 days per week, an upper lower split is often best.
- If you train 5 days per week, a PPLUL split gives you more volume (sets) without beating you up.
Warming Up and Double Progression
Before the first exercise, do 6 reps with about 50% of your working weight, then 4 reps with about 80%. Rest 1–2 minutes after each warm-up set. Use additional warm-up sets if you feel you need them, but you generally shouldn't need more than 2–3.
To progress these workouts, use double progression: use a weight that allows you to work within the given rep range, take each set 1–2 reps shy of failure, and once you hit the top of the range for your first set, add weight.
Failure is the point where you can’t move the weight with good form despite giving your maximum effort. Keeping 1–2 reps in reserve means stopping 1–2 reps before that point.
Which Muscles Does a Pull Workout Train?
A pull workout mainly trains your:
- Latissimus dorsi (lats)
- Posterior deltoids (rear delts)
- Mid-back muscles (rhomboids, infraspinatus, teres major and minor, and a few others)
- Trapezius (traps, particularly the lower and middle traps)
- Erector spinae (spinal erectors)
- Biceps brachii
- Brachialis
- Brachioradialis
- Forearms (almost every pulling exercise requires a strong grip)
If your pull workout includes deadlifts or Romanian deadlifts, then it also trains your glutes and hamstrings.
The 15 Best Pull Day Exercises
- Barbell Deadlift
- Barbell Romanian Deadlift
- Underhand Machine Lat Pulldown
- Chest-Supported Seated Machine Row
- Pull-Up
- Lat Pulldown
- Close-Grip Lat Pulldown
- Seated Cable Row
- One-Arm Dumbbell Row
- Cable Pullover
- Machine Rear Delt Fly
- Dumbbell Rear Delt Fly
- Bayesian Cable Curl
- Machine Curl
- Incline Dumbbell Curl
1. Barbell Deadlift
How to:
- Load the bar with plates. If you aren't strong enough (yet!) to use at least one 45-pound plate on either side, rest the loaded ends on two stacks of plates so the bar sits about 8-to-10 inches off the floor (or use lighter plates with the same diameter as 45-pound plates).
- Position your feet slightly narrower than shoulder-width apart with your toes pointed slightly out, and move the bar over the middle of your feet so that it's under or slightly behind your shoulders when you bend over and grab it.
- Push your hips backward and bend at the waist and knees until you can touch the bar. Grip it just outside your shins with both palms facing down, and press your upper arms into your sides as if you were trying to crush oranges in your armpits. Keep your arms straight and locked, and your head neutral—don't look up at the ceiling or down at the ground.
- Take a deep breath into your stomach, brace your abs, squeeze the bar as hard as you can, and straighten your back by pushing your hips slightly upward. The bar shouldn't rise off the floor yet, but you should feel tension in your lower back, hips, and hamstrings ("taking out the slack").
- Explode upward by pushing through your heels to "break" the bar off the floor, keeping your spine straight, lower back slightly arched, and core tight—your hips and shoulders should rise at the same rate. Once the bar passes your knees, push your hips into it as you continue to stand up. When you're fully upright, your chest should be out and shoulders down—don't lean back, hyperextend your lower back, or shrug the weight up.
- To lower the bar, push your hips backward and, keeping your lower back slightly arched and core tight, let the bar slide straight down your thighs until it clears your knees. Then, maintaining your grip, allow it to drop to the floor and adjust your body for the next rep. The entire descent should take one-to-two seconds or less.
Sets, Reps, and Rest: 3 sets | 4–6 reps | 2–3 min rest
Why: The barbell deadlift is a pulling exercise that trains all of your "posterior chain" muscles—your glutes, hamstrings, spinal erectors, and even your lats, traps, and mid-back to a lesser degree.
Mike's tip: Do a full reset between every rep. That means lowering the bar, taking a moment to get yourself back into the proper starting position, and then doing your next rep. Don't bounce the bar off the floor or immediately go from one rep to the next.
Alternatives:
2. Barbell Romanian Deadlift
How to:
- Adjust the pins or hooks in a squat rack so the bar is at your midthigh, and load it with plates (or load the bar on the floor if you don't have a rack).
- Grip the bar just outside your thighs with your palms facing you, lift it off the rack (or floor), take one step back with each foot, and turn your toes out and bend your knees slightly.
- Stand up tall with your chest out and arms at your sides, take a deep breath into your stomach, and brace your abs.
- Squeeze the bar as hard as you can, press your upper arms into your sides, and, with a flat back, lower the bar toward the floor in a straight line, allowing your butt to move backward as the bar descends.
- Once you feel a stretch in your hamstrings, bend your knees just enough to let the bar keep descending, and continue lowering it until your lower back begins to round—just below the knees for most people, about midshin for the particularly flexible.
- Bring the bar upward by driving your hips toward it, keeping your arms straight, lower back slightly arched, and core tight, and return to the starting position.
- On the last rep of a set, finish it fully (legs locked), then move the bar back to the pins or hooks—don't try to deadlift it directly back onto them.
Sets, Reps, and Rest: 3 sets | 6–8 reps | 2–3 min rest
Why: The barbell Romanian deadlift emphasizes your hamstrings and glutes. You use less weight than you would in a conventional deadlift, but it also tends to be easier on your joints and isn't limited as much by your low-back strength.
Mike's tip: If your grip gives out before your glutes, hamstrings, and back (which is usually the case after 6-to-12 months of proper training), use weightlifting straps. This makes it easier on your forearms, but harder on every other muscle.
Alternatives:
3. Underhand Machine Lat Pulldown
How to:
- Adjust the thigh pad so that it locks your legs in place and prevents your butt from rising off the seat when pulling the handles down.
- Grab the handles with your palms facing toward you (supinated), sit down, and wedge your legs underneath the thigh pad.
- Sit with your chest proud and a slight arch in your lower back. If the machine has a chest pad, keep your chest against it.
- Relax your arms and shoulders, letting the weight pull your arms straight and your shoulders as high as possible.
- Staring straight ahead, pull the handles down by bending your elbows and pulling your shoulder blades down and back simultaneously, ending when your hands are about level with your midchest.
- Pause briefly, then reverse the movement to return to the starting position: straighten your arms and let the weight pull your shoulder blades as high as they'll go.
Sets, Reps, and Rest: 3 sets | 6–8 reps | 2–3 min rest
Why: This is basically a lat pulldown performed with a different grip and from a slightly different angle. It trains your lats, but also your traps and biceps. Unfortunately, many gyms don't have one.
Mike's tip: Focus on keeping your chest high throughout the entire rep, getting a deep stretch in your shoulders and upper back at the top of every rep, and pulling your elbows all the way down to your sides.
Alternatives:
- Close-Grip Lat Pulldown (below)
- Lat Pulldown (below)
- Chest-Supported Seated Machine Row (below)
4. Chest-Supported Seated Machine Row
How to:
- Adjust the seat height so the top of the chest pad is level with the top of your breastbone, and grip the handles with your arms straight. If the handles are adjustable, set them so they're just out of reach when you extend your arms.
- Grab the handles and let the weight pull your arms straight and your shoulder blades as far forward as they'll go.
- Staring straight ahead, pull the handles back by bending your elbows and retracting your shoulder blades simultaneously. Pull the handles as far back as you can, generally until your hands are level with your chest, and your shoulder blades are pinched together and down.
- Pause briefly, then reverse the movement to return to the starting position: straighten your arms and let the weight pull your shoulder blades as far forward as they'll go.
Sets, Reps, and Rest: 3 sets | 6–8 reps | 2–3 min rest
Why: The chest pad allows you to better isolate your traps, back, and arms, since your lower back strength is no longer a limiting factor in the exercise. It’s also fast to set up, and most machines allow you to add weight in small increments.
Mike's tip: Once you hit failure, do a few shrug-backs to train your traps and mid-back even more.
Alternatives:
- One-Arm Dumbbell Row (below)
- Seated Cable Row (below)
- Chest-Supported T-Bar Row
5. Pull-Up
How to:
- Grab a pull-up bar with your palms facing away from you and your hands about shoulder-width apart.
- Lift your feet off the floor and relax your arms and shoulders, letting your body weight pull your arms straight and your shoulders as high as possible (they should be almost touching your ears).
- Stare straight ahead and flex your glutes and hamstrings to keep your lower body from swinging (a good cue to remember is "tighter is lighter").
- Pull yourself up by bending your elbows and pulling your shoulder blades down simultaneously. Keep pulling until your chest touches the bar and your elbows are tucked against your sides.
- Pause for a brief moment, and then lower yourself to the starting position.
Sets, Reps, and Rest: 3 sets | 6–8 reps | 2–3 min rest
Why: The pull-up trains your lats, biceps, and lower traps without a machine, and you can add weight with a dip belt once bodyweight reps become easy.
Mike's tip: One technique that will immediately make you stronger at pullups is to lean back slightly so your chest is facing the bar. Your arms and torso should be in almost the same position as they would be in an incline bench press. This puts your lats in a much more biomechanically efficient position for pulling, and better engages your lats.
Alternatives:
- Chin-Up
- Assisted Pull-Up
- Lat Pulldown (below)
6. Lat Pulldown
How to:
- Adjust the thigh pad so that it locks your legs in place and prevents your butt from rising off the seat when pulling the bar down.
- Grab the bar with your palms facing away from you and a few inches wider than shoulder-width apart. Sit down, letting your body weight pull the bar down with you, and then wedge your legs underneath the thigh pad.
- Sit slightly behind the cable rather than directly under it, with your chest proud and a slight arch in your lower back.
- Relax your arms and shoulders, letting the weight pull your arms straight and your shoulders as high as possible (they should be almost touching your ears).
- Staring straight ahead, pull the bar down by bending your elbows and pulling your shoulder blades down and back simultaneously. Keep pulling until the bar is a few inches from your collarbone (usually an inch or two below your chin).
- Pause briefly, then reverse the movement to return to the starting position: straighten your arms and let the weight pull your shoulder blades as high as they’ll go.
Sets, Reps, and Rest: 3 sets | 6–8 reps | 2–3 min rest
Why: Many people aren’t strong enough to do a pull-up or chin-up, which makes the lat pulldown a better stopgap exercise until they develop more upper-body strength. The pull-up and chin-up are also very taxing, which can make the lat pulldown a better exercise to include at the end of your workout when you’re already gassed.
Mike's tip: Make sure you relax your shoulders at the top of each rep and pull them down as far as you can at the bottom of each rep. This ensures your lower-traps and mid-back are thoroughly trained.
Alternatives:
- Pull-Up (above)
- Chin-Up
- Close-Grip Lat Pulldown (below)
7. Close-Grip Lat Pulldown
How to:
- Attach a V-grip (close-grip) handle to the lat pulldown machine, and adjust the thigh pad so that it locks your legs in place and prevents your butt from rising off the seat when pulling the handle down.
- Grab the handle with your palms facing each other, sit down, and wedge your legs underneath the thigh pad.
- Relax your arms and shoulders, letting the weight pull your arms straight and your shoulders as high as possible (they should be almost touching your ears).
- Staring straight ahead, pull the handle down by bending your elbows and pulling your shoulder blades down and slightly back simultaneously. Keep pulling until the handle touches your torso—usually at the top of your breastbone.
- Pause briefly, then reverse the movement to return to the starting position: straighten your arms and let the weight pull your shoulder blades as high as they'll go.
Sets, Reps, and Rest: 3 sets | 6–8 reps | 2–3 min rest
Why: The close-grip lat pulldown is my favorite pulldown variation for training your lats, biceps, and traps. Many people find it more comfortable and feel like it allows them to use a slightly longer range of motion.
Mike's tip: Think about "lifting your chest to the handle" at the bottom of each rep. This puts your shoulders in a more biomechanically efficient position for pulling and makes it easier to feel your lats contracting.
Alternatives:
- Lat Pulldown (above)
- Pull-Up (above)
- Chin-Up
8. Seated Cable Row
How to:
- Attach the handle to the cable row machine, sit on the pad, and place your feet against the footrests.
- Lean forward, grab the handle, and lean backward slightly so that your back is perpendicular to the floor and your arms are straight out in front of you.
- Keeping your back straight and staring straight ahead, let the handle pull your shoulder blades forward as far as they'll go.
- Pull the handle toward your abdomen by bending your elbows and retracting your shoulder blades simultaneously. Keep your elbows close to your sides and pull until the handle touches your abdomen, your forearms are roughly parallel with the floor, and your shoulder blades are pinched together and down.
- Once the handle touches your torso, straighten your arms and let the weight pull your shoulder blades forward as far as they'll go to return to the starting position.
Sets, Reps, and Rest: 3 sets | 6–8 reps | 2–3 min rest
Why: The seated cable row trains your lats, rhomboids, traps, rear delts, and biceps. It also requires you to support your torso, so lower-back fatigue can become a limiting factor as you get stronger.
Mike's tip: Let your shoulder blades move forward at the bottom of each rep (scapular protraction), then pull them back as you bend your elbows (scapular retraction). Concentrate on getting as deep of a stretch in your shoulder blades as you can, then hold the squeezed position for 1–2 seconds. This is the key to ensuring your traps are worked by this exercise, too.
Alternatives:
9. One-Arm Dumbbell Row
How to:
- Hold a dumbbell in your right hand. Plant your left knee and arm firmly on a bench, your right foot on the floor a foot or two from the bench, and let your right arm (the one holding the dumbbell) hang straight down toward the floor.
- Let the weight pull your shoulder blade as far forward as it can go—it helps to rotate your torso slightly to get an even deeper stretch.
- Keeping your back straight and staring straight ahead, pull the dumbbell toward your torso by bending your right elbow and retracting your right shoulder blade simultaneously. Keep your elbow close to your side and pull until the dumbbell touches your torso and your shoulder blade is pulled back and down.
- Once the dumbbell touches your torso, straighten your arm and let the weight pull your shoulder blade forward as far as it'll go to return to the starting position.
- Once you've completed the desired number of reps, repeat the process with your left arm.
Sets, Reps, and Rest: 3 sets | 6–8 reps | 2–3 min rest
Why: The one-arm dumbbell row allows you to get a deep stretch in your lats and brace your free arm against a bench, making lower-back fatigue less likely to limit your performance.
Mike's tip: Let your shoulder drop toward the ground a bit at the bottom of each rep so you feel a deep stretch in your lats and mid-back.
Alternatives:
10. Cable Pullover
How to:
- Set the pulley to the highest position on a cable machine and attach a straight bar.
- Grab the bar with your palms facing away from you and a few inches wider than shoulder-width apart.
- Step backward until your arms are pulled straight and there's no more slack in the cable. Lean forward at the waist until your body makes a 45-degree angle with the floor and your arms are nearly straight overhead and in line with your torso.
- Keeping a slight bend in your elbows, pull the bar in an arc toward your feet until the bar runs into your thighs.
- Pause for a brief moment, then reverse the movement and return to the starting position.
Sets, Reps, and Rest: 2 sets | 8–10 reps | 1–2 min rest
Why: The cable pullover, sometimes called the “straight-arm lat pulldown” or “lat prayer,” trains your lats without being limited by your biceps strength. That makes it one of the few exercises that allows you to truly isolate your lats.
Mike's tip: Allow your torso to straighten slightly at the bottom of each rep and lean over a bit more at the top of each rep. Unlike most isolation exercises, where you want to minimize any movement except for the limbs you’re training, moving your torso slightly back-and-forth helps you get a deeper stretch and more range of motion with this exercise.
Alternatives:
11. Machine Rear Delt Fly
How to:
- Adjust the seat height so the handles are in line with your shoulders, then adjust the handles so your hands are as close together as possible.
- Grip the handles with your palms facing the floor (if the machine allows) and keep a slight bend in your elbows. Push your torso into the chest pad and shrug your shoulders forward as far as you can.
- Keeping your shoulders shifted forward, push your hands away from each other in an arc.
- Once your upper arms are roughly in line with your torso, reverse the motion and return to the starting position.
Sets, Reps, and Rest: 3 sets | 8–10 reps | 1–2 min rest
Why: The machine rear delt fly is the best exercise for isolating your rear delts, which aren't thoroughly trained by most compound exercises.
Mike's tip: Let the weight pull your shoulder blades forward, and keep them in that position throughout each rep. In other words, don’t pinch your shoulder blades together when you extend your arms to the side. This forces your rear delts to do most of the work instead of your traps.
Alternatives:
12. Dumbbell Rear Delt Fly
How to:
- Holding a dumbbell in each hand, stand with your feet about shoulder-width apart.
- Keeping your back straight, lean forward by hinging at your hips and letting your knees bend slightly, just as you would for a deadlift.
- Take a breath, bend your elbows slightly, and then extend your arms out in an arc toward the ceiling with your palms facing the ground.
- Keep raising the dumbbells until your arms are roughly parallel to the floor, then lower them and return to the starting position.
Sets, Reps, and Rest: 3 sets | 8–10 reps | 1–2 min rest
Why: The dumbbell rear delt fly also trains your rear delts, using dumbbells instead of a reverse fly machine.
Mike's tip: Keep your shoulder blades pushed down toward the floor throughout each rep. Don’t pinch your shoulder blades together when you raise the dumbbells.
Alternatives:
13. Bayesian Cable Curl
How to:
- Set a cable pulley to its lowest position, attach a single handle, and stand next to the pulley. Grab the handle with your right hand, then turn so your back faces the weight stack.
- Step 1–2 feet forward with your left foot, place your left hand on your left thigh, and lean forward slightly.
- Turn your right palm forward, position your elbow about an inch behind your right lat, and let the cable straighten your arm and stretch your biceps.
- Without moving your elbow forward, curl the handle toward your shoulder.
- Reverse the movement, finish the set, and repeat with your left arm.
Sets, Reps, and Rest: 3 sets | 8–10 reps | 1–2 min rest
Why: The Bayesian cable curl trains your biceps with your elbow behind your torso, a position that emphasizes the long head of your biceps. The cable also keeps consistent tension on your biceps throughout the entire rep.
Mike's tip: Some people find that they get an even stronger contraction if they lean forward slightly at the top of each rep, though personally I like to keep my torso more or less stationary. Also, it's best to perform this exercise with a staggered stance, but it doesn't matter which leg you put forward.
Alternatives:
- Incline Dumbbell Curl (below)
14. Machine Curl
How to:
- Adjust the arm pad or seat (depending on your machine) so the top of the pad sits snugly against your armpits and the backs of your upper arms when you're sitting.
- Grab the handles with your palms facing up and extend your elbows until your arms are nearly straight.
- Curl the handles as close to your shoulders as you can without lifting your upper arms off the pad.
- Pause for a brief moment, and then lower the handles and return to the starting position.
Sets, Reps, and Rest: 3 sets | 8–10 reps | 1–2 min rest
Why: The machine curl makes it almost impossible to cheat and requires very little coordination, so you can focus on contracting your biceps as hard as possible and taking each set close or all of the way to failure.
Mike's tip: Curl machines are hit or miss. Some machines force you into an awkward position or have a very extreme resistance curve (the weight feels significantly harder during portions of the rep than others), whereas others are very comfortable and keep consistent tension on your biceps throughout each rep. If your gym has one, give it a shot, but don't be afraid to stick with dumbbells, barbells, or cables instead.
Alternatives:
15. Incline Dumbbell Curl
How to:
- Sit back on an incline bench set to 45 degrees. Hold a dumbbell in each hand and let your arms hang straight down with your palms facing each other.
- Without moving your left arm, flex your right arm and curl the dumbbell up until it's in front of your right shoulder. As you lift the dumbbell, rotate your wrist so your palm faces your shoulder at the top of the rep.
- Lower the dumbbell to the starting position and repeat with your left arm.
Sets, Reps, and Rest: 3 sets | 8–10 reps | 1–2 min rest
Why: Like the Bayesian curl, the incline dumbbell curl trains your biceps while your upper arms are behind your torso. It's a good alternative and has the advantage of letting you train both arms at the same time, but I prefer the Bayesian curl because the cable keeps more consistent tension on your biceps throughout every rep.
Mike's tip: Keep your elbows behind your torso—avoid the temptation to push your elbows forward at the top of each rep.
Alternatives:
Want More Workouts Like This?
- The Best Push Day Workout for Size & Strength
- The Best Push Pull Legs Routines for Mass Gains
- The Best Upper Lower Split Workouts for Mass & Strength
- The 13 Best Lat Exercises and 3 Lat Workouts
Scientific References +
- ↩ Handelsman DJ, Hirschberg AL, Bermon S. Circulating testosterone as the hormonal basis of sex differences in athletic performance. Endocr Rev. 2018;39(5):803-829.
- ↩ Bhasin S, Storer TW, Berman N, et al. The effects of supraphysiologic doses of testosterone on muscle size and strength in normal men. N Engl J Med. 1996;335(1):1-7.
- ↩ Bhasin S, Woodhouse L, Casaburi R, et al. Testosterone dose-response relationships in healthy young men. Am J Physiol Endocrinol Metab. 2001;281(6):E1172-E1181.