The rack pull is an often undervalued exercise because it basically looks like a less-effective deadlift.
In reality, though, it’s a fantastic exercise for developing your back muscles and gaining strength, and when used properly, the rack pull can help you break through plateaus in your conventional deadlifting.
What’s more, the rack pull puts less stress on your lower back and hips than the conventional deadlift, which makes it ideal for people who are training around an injury or who want to keep pulling (in a new training block, for example) but with less strain on their joints.
So, if you want to learn how to use rack pulls for back training, this is the article for you.
What Are Rack Pulls?
The rack pull works the same way as the conventional deadlift, except you begin with the bar resting on the safety arms of a squat rack at about knee height.
With the rack pull, you’re just doing the top half of a conventional deadlift—pulling the bar from roughly knee height until you’re standing upright (a position known as “lockout”).
Rack Pulls vs. Deadlifts
Because the bar starts from an elevated position, rack pulls have a considerably shorter range of motion than the conventional deadlift. This means two things:
- Your legs don’t contribute as much.
- You can rack pull much more weight than you can deadlift.
Thus, you can use rack pulls in a couple of ways:
- To supplement your conventional deadlifting. For example, you could do conventional deadlifts on Tuesdays and rack pulls on Fridays. This lets you train many of the same muscles as the conventional deadlift without beating yourself up by deadlifting twice per week.
- To replace your conventional deadlifting. While I don’t generally advocate this, it’s a good solution for training around an injury (especially a lower-back or hip injury), which are often irritated by conventional deadlifting.
Rack Pulls: Benefits
1. Rack pulls increase back size and strength.
There are two main reasons people use rack pulls for back training:
- Rack pulls are a compound exercise that trains every muscle group in your back at the same time, which allows you to lift heavier weights than other back exercises, especially compared to back isolation exercises like back extensions.
- Rack pulls are easy to progressively overload (add weight and reps to over time), which is one of the best ways to maximize muscle growth.
2. Rack pulls improve your deadlift performance.
Rack pulls improve your deadlift performance in three ways:
- They allow you to train all of the back muscles used in the conventional deadlift, but with more weight.
- They don’t involve as much total muscle mass as the deadlift, so they tend to be less fatiguing, which means you can do them more often without wearing yourself to a frazzle.
- They emphasize the top (or “lockout”) portion of the deadlift, which many people struggle with.
Because of these factors, thinking in terms of “rack pulls vs deadlifts” is wrongheaded. Instead, think of rack pulls as supplementary to your conventional deadlifting.
3. Rack pulls put less stress on your lower back.
Because you start from a more upright position in the rack pull than you do in the deadlift, you place less stress on your lower back.
This is useful for people who want to get the benefits of deadlifts (and their many variations), but who are training around or trying to avoid reaggravating a back injury
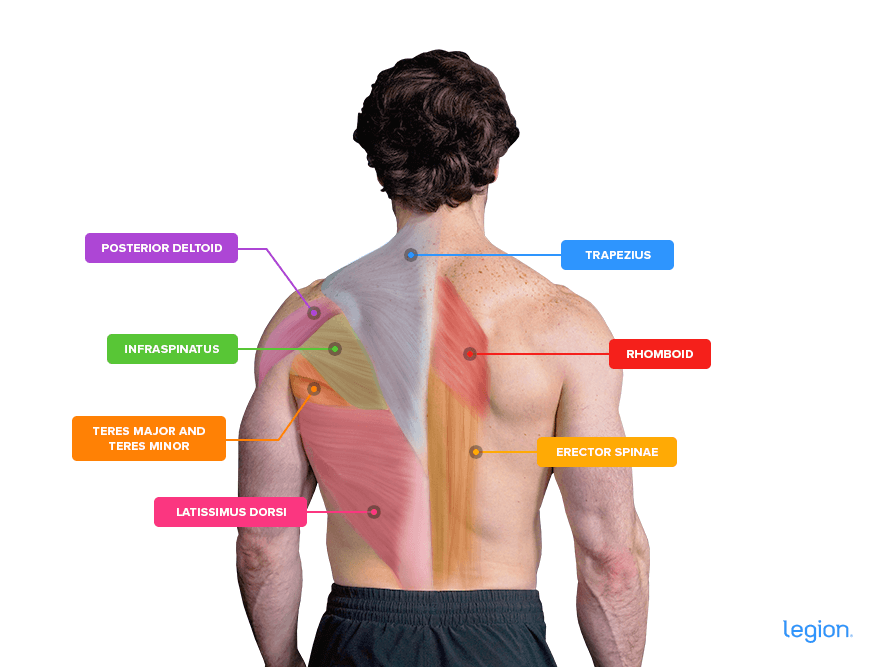
Rack Pulls: Muscles Worked
Because rack pulls look so simple and undemanding compared to the traditional deadlift, many people wonder, “what do rack pulls work?”
The answer is straightforward: every muscle in your back.
Specifically, the muscles worked by rack pulls are the . . .
- Latissimus dorsi
- Trapezius
- Rhomboids
- Teres major and minor
- Posterior deltoids
- Infraspinatus
- Erector spinae
. . . and they also train your core, glutes, and hamstrings to a smaller degree, too.
Here’s how the main muscles worked by rack pulls look on your body:
How to Use Rack Pulls
The best way to learn how to do rack pulls is to break the exercise into three parts: set up, pull, and descend.
Step 1: Set up
Set the safety arms or pins in a squat rack to knee height or slightly lower (normally about 12-to-18 inches off the floor) and place a barbell on the pins.
Load the barbell with plates, then position your feet so they’re a bit less than shoulder-width apart with your toes pointed slightly out, and the barbell is directly over your midfoot. (Use the same stance you would with the conventional deadlift).
Bend over and grab the bar with a double-overhand grip (both palms facing toward your body) just outside your shins. Take a deep breath of air into your belly (as opposed to your chest), and brace your abs as if you were about to get punched in the stomach (the Valsalva maneuver).
Flatten your back by pushing your hips up, wedging yourself into what’s essentially a “quarter-squat” position. Pull your shoulder blades “back and down” and push your upper arms into your sides (a good cue for this is to “crush oranges in your armpits”).
Step 2: Pull
Squeeze the bar as hard as you can and pull it straight up.
As you pull, think about forcefully thrusting your hips toward the bar and driving your body upward and slightly back, onto your heels. Push through your heels, and keep your elbows locked in place and lower-back slightly arched (no rounding!).
Your hips and shoulders should rise simultaneously. Don’t shoot your hips up and then use your back like a lever to raise your shoulders.
Try to keep the bar on as vertically straight of a path as possible because any deviations will slow you down and make it harder to maintain good form. The bar shouldn’t move noticeably toward or away from you.
At the top, your chest should be up and your shoulders down. Don’t lean back, hyperextend your lower-back, or shrug the weight up.
Step 3: Descend
While keeping your back flat and your core tight, reverse the movement to return the bar to its starting position on the safety arms. This is basically a mirror image of what you did during the pull.
Let the bar slide straight down your thighs while letting your hips move backward until the bar reaches the safety arms.
Lower the bar quickly but smoothly. The entire descent should take a second or less.
Take a moment to get into the proper setup position, then start your next rep.
Rack Pulls: Variations
1. Smith Machine Rack Pulls
Generally speaking, machines such as the Smith machine aren’t as effective as free weights for building muscle. However, if you don’t have access to a squat rack or just want to mix up your training, Smith machine rack pulls are a workable alternative.
How to:
- Set the safety pins in a Smith machine to knee height or slightly lower (normally about 12-to-18 inches off the floor).
- Load the Smith machine bar with plates, then position your feet so that they’re a bit less than shoulder-width apart with your toes pointed slightly out, and the bar is directly over your midfoot.
- Move down toward the bar by pushing your hips back and grip the bar just outside your shins with a double-overhand grip.
- Take a deep breath of air into your belly, flatten your back by pushing your hips up slightly, and twist the bar to unrack the weight.
- Drive your body upward and slightly back by pushing through your heels until you’re standing up straight.
- Reverse the movement and return to the starting position.
2. Above the Knee Rack Pulls
Rack pulls above the knee (also known as “high rack pulls”) are similar to standard rack pulls except you set the safety bars slightly higher (above knee height), which makes the range of motion even shorter. This increases the amount of weight you can lift but decreases the amount of work your lower back has to do, placing most of the load on your traps (which is why some people believe they’re the best rack pulls for traps training).
How to:
- Set the safety pins in a squat rack to slightly higher than knee height (normally about 18-to-22 inches off the floor) and place a barbell on the pins.
- Load the barbell with plates, then position your feet so that they’re a bit less than shoulder-width apart with your toes pointed slightly out, and the barbell is directly over your midfoot.
- Move down toward the bar by pushing your hips back and grip the bar just outside your shins with a double-overhand grip.
- Take a deep breath of air into your belly, flatten your back by pushing your hips up slightly, and then drive your body upward and slightly back by pushing through your heels until you’re standing up straight.
- Reverse the movement and return to the starting position.
3. Sumo Rack Pulls
Sumo rack pulls train your legs and glutes more than standard rack pulls because the wider stance puts your back in an even more upright position. This makes them ideal for building the strength you need to complete the “lockout” portion of the standard sumo deadlift.
How to:
- Set the safety pins in a squat rack to about mid-shin height or slightly above (normally about 10-to-15 inches off the floor) and place a barbell on the pins.
- Load the barbell with plates, then position your feet so that they’re outside of shoulder-width apart with your toes pointed out to the sides at about 25 degrees, and the barbell is directly over your midfoot.
- Drop your butt down, letting your knees bend slightly while staying in line with your feet and keeping your back straight, and grip the bar with a shoulder-width double-overhand grip.
- Take a deep breath and stand up while dragging the bar up your shins and over your knees.
- Reverse the movement and return to the starting position.
4. Wide-Grip Rack Pulls
If you do rack pulls for traps development, wide-grip rack pulls (or “snatch-grip rack pulls”) are a good option because gripping the bar with a wider grip increases the amount of work the traps have to do. However, it also increases the range of motion of the exercise which reduces how much weight you can use.
How to:
- Set the safety pins in a squat rack to about knee height or slightly lower (normally about 12-to-18 inches off the floor) and place a barbell on the pins.
- Load the barbell with plates, then position your feet so that they’re a bit less than shoulder-width apart with your toes pointed slightly out, and the barbell is directly over your midfoot.
- Move down toward the bar by pushing your hips back and grip the bar with an overhand grip about 1.5-to-2 times wider than your shoulders.
- Take a deep breath of air into your belly, flatten your back by pushing your hips up slightly, and then drive your body upward and slightly back by pushing through your heels until you’re standing up straight.
- Reverse the movement and return to the starting position.
5. Isometric Rack Pulls
Isometric rack pulls are an effective way to train the bottom portion of the deadlift. This means they’re a great exercise for improving your deadlift performance if you struggle to get the bar off the floor.
How to:
- Set the safety pins in a squat rack to knee height or slightly lower (normally about 12-to-18 inches off the floor) and place a barbell on the floor, directly under the middle of the safety pins.
- Stand in the middle of the squat rack and position your feet so they’re a bit less than shoulder-width apart with your toes pointed slightly out.
- Move down toward the bar by pushing your hips back and grip the bar just outside your shins with a double-overhand grip.
- Pick the bar off the floor and move it so that it’s directly over your midfoot.
- Take a deep breath of air into your belly, flatten your back by pushing your hips up slightly, and then drive your body upward and slightly back by pushing through your heels until the bar is in contact with the safety pins.
- Pull as hard as you can into the pins for 5-to-10 seconds, then reverse the movement and return to the starting position.
Scientific References +
- G, J., N, B., A, N., & D, H. (1994). Anatomy and actions of the trapezius muscle. Clinical Biomechanics (Bristol, Avon), 9(1), 44–50. https://doi.org/10.1016/0268-0033(94)90057-4
- DJ, O., AG, S., AR, N., & JB, C. (2019). Isometric training and long-term adaptations: Effects of muscle length, intensity, and intent: A systematic review. Scandinavian Journal of Medicine & Science in Sports, 29(4), 484–503. https://doi.org/10.1111/SMS.13375