You’d be hard-pressed to find a safety squat bar in most gyms a decade ago.
But nowadays, more and more of them have added this specialty bar to their arsenal.
You’ve probably seen one yourself—a barbell with slightly curved ends, two handles in the middle, and padding around the neck and base of the handles.
What are the benefits of the safety squat bar, and how does it compare to the regular back or front squat, you wonder? Should you try this exercise, or is it another distracting gimmick? And if it is worth doing, how do you do it properly?
That’s what you’ll learn in this article.
- What Is the Safety Squat Bar?
- Safety Bar Squat vs. the Back Squat: The Advantages
- The Downside of the Safety Bar Squat
- How to Do the Safety Bar Squat Properly
- FAQ #1: What’s the best safety squat bar?
- FAQ #2: Can you buy a safety squat bar attachment?
- FAQ #3: How much does a safety squat bar weigh?
Table of Contents
+What Is the Safety Squat Bar?
The safety squat bar is a special kind of padded barbell invented and patented in 1984 by Jesse Hoagland, a former steel factory worker who became a fitness entrepreneur.
Here’s what it looks like when loaded with plates:
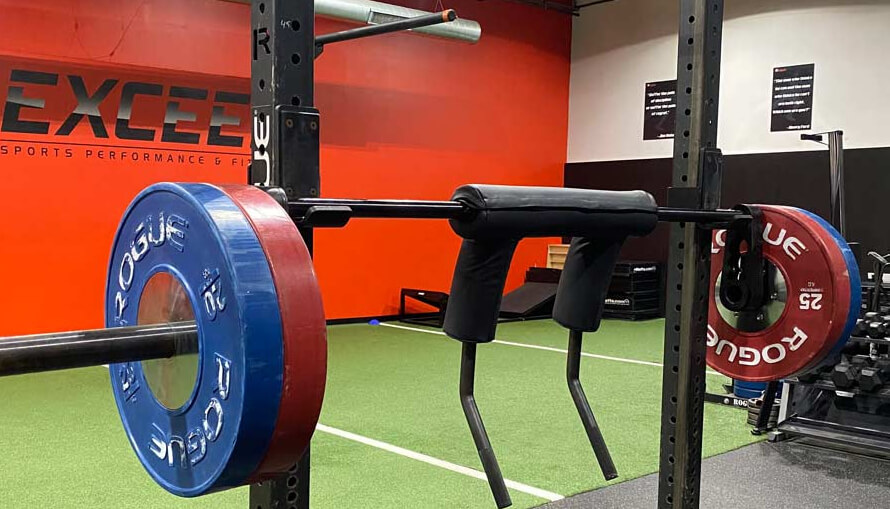
As you can see, the main differences between a safety squat bar and a regular barbell are the safety squat bar . . .
- Holds the plates in a slightly offset position, rather than perfectly in line with the center of the bar.
- Has two central handles in the middle of the bar that go on either side of your head.
- Has padding between the handles and central bar and your neck.
When you try a safety squat bar for the first time, the first thing you’ll probably notice is that it feels significantly more comfortable than a regular barbell. This is because the layout of the handles and the padding spreads the weight over a larger area of your body (your upper back and shoulders) rather than just across your upper back like a regular barbell.
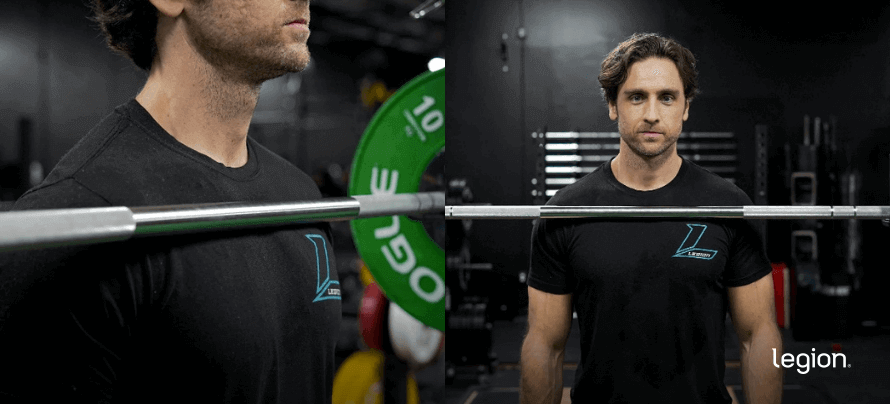
Here’s what the safety bar squat looks like, performed by powerlifting and strongman champion Eddie Hall:
There isn’t much research on how effective the safety bar squat is for gaining muscle and strength, but it’s fair to assume that much of the research on similar squat variations is also applicable. For instance, research shows that the regular barbell squat activates more than 200 muscles in the body, and the safety bar squat probably produces similar benefits.
Specifically, the key muscles trained by the safety bar squat are the:
Now, you might be thinking, “doesn’t the regular barbell back squat train the same muscles?” Yes, it does, although the safety bar squat offers some unique benefits.
Safety Bar Squat vs. the Back Squat: The Advantages
Here are seven benefits that are unique to the safety bar squat:
- It’s easier on your shoulders. While you need a decent amount of shoulder mobility to perform a regular back squat (especially the low-bar version), that’s not the case with the safety bar squat, because you keep your arms in front of your body instead of wedging them under the bar. This makes the safety bar squat a great exercise for people with lingering shoulder injuries, soreness, or poor mobility.
- You’ll be able to maintain a more upright position, which makes the exercise less strenuous on your lower back. As a result, research indicates the safety squat bar places people at less risk of lower-back injuries compared to the regular back squat.
- People generally find it easier to reach proper depth during a safety bar squat than a barbell back squat, also because the bar makes it easier to maintain an upright position. This is particularly true for people with long femurs, who often have to lean very far forward to reach proper depth with the regular barbell back squat.
- It may activate some muscles more than the barbell back squat. For example, a study published in the Journal of Strength and Conditioning Research found that the safety bar squat activated the lower trapezius by about 50% more than using a standard barbell (how much this really matters when it comes to building muscle is debatable, but it’s a nice perk).
- It’s excellent for doing high-rep squats. People often experience shoulder discomfort or numbness in their arms when back squatting for high reps. This is much less likely to happen when using a safety squat bar.
- You need less weight on the safety squat bar to get an effective training stimulus compared to if you would use a regular barbell. That’s because the bar holds the plates in an offset position which makes the exercise harder (though not less effective).A case in point: a study found that people could squat, on average, 11.3% less weight with the safety squat bar compared to with a regular bar.This can be beneficial because it means you’ll put less stress on your tendons, ligaments, and spine while getting similar levels of muscle activation, making the exercise marginally safer than the standard back squat.
- It’s a fun way to inject a bit of variety into your workouts. Some people experience a drop in motivation when doing the same exercises for months or years on end. If that applies to you, switching to the safety bar squat for a while might spice things up and make your workouts more enjoyable.
The Downside of the Safety Bar Squat
While there are plenty of reasons to try the safety bar squat, it also comes with two main downsides:
First, research indicates that the safety squat bar activates the abs, medial and lateral hamstring, quadriceps (vastus lateralis, medialis, and rectus femoris), and gastrocnemius (a calf muscle) to a lesser extent than the regular barbell squat. Thus, you could argue that the regular barbell squat might be a bit better for building muscle overall (though the differences are likely too small to matter in the big scheme of things).
Basically, while it might be a little less effective at activating your lower-body muscles and core, the differences probably aren’t big enough to matter, and you shouldn’t hesitate to use the safety bar squat in your training.
Second, if you stop back squatting for several months to try safety bar squatting instead, you’ll likely notice that your back squat one-rep max drops anywhere from 10-to-20% when you switch back to it. While this isn’t a fault of the safety bar squat per se, it can throw you for a loop if you aren’t prepared for it.
How to Do the Safety Bar Squat Properly
The best way to learn the safety bar squat is by breaking down the movement into four parts: set up, descend, and ascend.
Step 1: Set Up
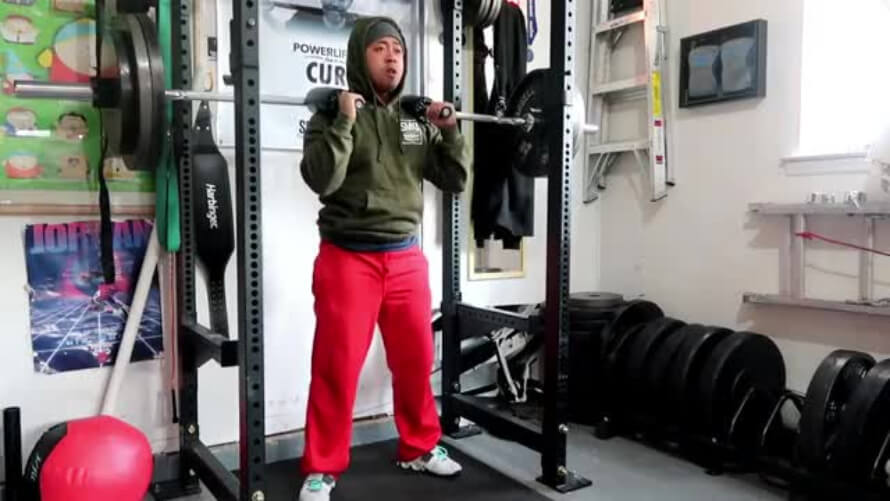
First, position the bar in a squat rack about one to two inches below where it will be when you’re standing tall, or around the top of your breastbone, like this:
Next, lean forward and position your head between the two handles with the main bar resting on your upper back, and grab one handle in each hand.
Unrack the bar by standing up and taking one step back with each foot (one at a time). Adjust your feet so they’re a little wider than shoulder-width apart and point your toes out about 20-to-25 degrees (around one and eleven o’clock).
Here’s what you should look like:
Step 2: Descend
Take a deep breath into your stomach, push your chest out, brace your abs, and look at a spot on the floor about 10 feet in front of you. Then, sit down by pushing your hips backward and bending your knees at the same time, like this:

Keep sitting down until your thighs are parallel to the floor or slightly lower.
The biggest mistake people make during the descent is rounding their lower back at the bottom of the exercise. If you notice that your back rounds and that your hips start to tuck under, you’ve gone down too far.
Many people also have a tendency to pull the handles of the bar down when they’re at or near the bottom of the safety bar squat. This not only causes their upper body to move forward, but it also makes the exercise easier (and thus less effective).
When you pull the handles down, this changes the position of the plates in relation to your body in a way that changes the mechanics of the exercise, making it easier. So, try to avoid this if you can.
Step 3: Ascend
Start the ascent by driving your feet into the floor, ensuring your shoulders move upward at the same rate as your hips—a mirror image of what you did during the descent. About halfway up, push your hips forward and underneath the bar to return to the starting position.
Then, either begin your next rep or re-rack the bar by taking two steps forward so that the bar touches the rack. Then, keeping your weight pushed against the bar, bend your knees to lower it onto the J-cups on the rack.
FAQ #1: What’s the best safety squat bar?
There are hundreds of safety squat bars on the market, but most people would agree that the three best safety squat bars are:
- EliteFTS Safety Squat Bar: The EliteFTS safety squat bar is popular because of its oversized pads and rugged build quality. The only downside to the EliteFTS safety squat bar is it has intentionally small sleeves, which means regular spring collars are too big and won’t keep your plates securely on the bar (you’ll need to buy wider collars to keep your plates in place). The EliteFTS safety squat bar weighs 65 pounds.
- Titan Safety Squat Bar: The Titan safety squat bar is almost exactly the same as the EliteFTS safety squat bar. The only significant differences are that the padding on Titan’s bar is slightly more dense, which makes it a little less comfortable, and the sleeves are standard Olympic size, which means you can use regular spring collars (though perhaps not highly calibrated plates). Despite these minor differences, the Titan safety squat bar is about half the price of the EliteFTS version. The Titan safety squat bar weighs 61 pounds.
- Rogue Safety Squat Bar: Like everything Rogue makes, the Rogue safety squat bar looks and feels like a fine-grained product. The main difference between the Rogue safety squat bar and the other bars mentioned is that Rogue’s bar doesn’t have removable handles, which means you can’t use it for exercises like the JM press. The Rogue safety squat bar weighs 70 pounds.
FAQ #2: Can you buy a safety squat bar attachment?
You can’t buy an attachment that turns a standard straight bar into a safety squat bar.
You can buy attachments that wrap around standard bars and mimic the handles of a safety squat bar. However, because the bar is straight rather than cambered, they don’t fully recreate the feeling or benefits of squatting with a safety squat bar.
That said, if you want to give this a try, you don’t need to purchase a safety squat bar attachment. You can make your own DIY safety squat bar attachment by looping lifting straps around a straight bar and pulling the loose ends in front of your shoulders.
FAQ #3: How much does a safety squat bar weigh?
It depends—different bars weigh different amounts.
If you train at a gym, ask a member of staff how much their safety squat bar weighs, and if you’re looking to purchase a safety squat bar for your home gym, check the manufacturer’s website for the weight of their specific bar.
If the person at the gym doesn’t know, you can also bring a bathroom scale to the gym (or borrow the one from the locker room), weigh yourself, weigh yourself again holding the bar, and then subtract the first number from the second to figure out how much the bar weighs.
Scientific References +
- Hecker, K. A., Carlson, L. A., & Lawrence, M. A. (2019). Effects of the Safety Squat Bar on Trunk and Lower-Body Mechanics During a Back Squat. Journal of Strength and Conditioning Research, 33 Suppl 1, S45–S51. https://doi.org/10.1519/JSC.0000000000002912
- Oranchuk, D. J., Storey, A. G., Nelson, A. R., & Cronin, J. B. (2019). Isometric training and long-term adaptations: Effects of muscle length, intensity, and intent: A systematic review. Scandinavian Journal of Medicine & Science in Sports, 29(4), 484–503. https://doi.org/10.1111/SMS.13375