Key Takeaways
- Even when done properly, heavy weightlifting can cause considerable lingering tightness in your muscles and joints.
- Just 10 minutes of yoga poses per day can help tremendously by improving whole-body mobility and flexibility. This, in turn, can translate into better performance in the gym.
- Try my routine for 30 days and see for yourself.
I’ve been doing a lot of heavy compound weightlifting for about 7 years now, and I started to notice something a year or so ago:
My body felt a lot tighter than I was previously used to.
Specifically, my thighs, hips, shoulders, and lower back felt more rigid, and my flexibility seemed to have declined.
I first noticed this during and after heavy squatting, deadlifting, and bench pressing. My right quads and shoulder were often noticeably stiffer than my left, my right knee would often ache, my left sacroiliac (SI) joint often felt irritated, and my lower back was sometimes sorer than usual.
These things weren’t just annoying. They also got in the way of my progress and increased the risk of injury.
So I decided to do something about it: yoga.
I started taking weekly 60- and 90-minute yoga classes, and after several months, had learned a number of extremely helpful poses for increasing my whole-body flexibility and mobility.
I liked the classes but didn’t want the bodyweight training, just the stretching, so I turned my favorite yoga poses into two simple routines that take just 10 minutes per day.
I’ve been doing these routines for about six months now, and the results have been outstanding.
The right side of my body is looser, my right knee no longer hurts after heavy squats, my left SI joint rarely makes noise, and I haven’t heard a peep from my lower back. Even my massage therapist was surprised at how much of a difference it has made in my general levels of muscle tension.
This means I’ve been able to enjoy my big lifts again and not have to worry about getting hurt, and this has translated into better numbers and faster progress.
I want to share my routines with you in this article because chances are they can help you too. They address the most common joint and muscular problems us weightlifters run into.
As you’ll see, there are two routines—lower and upper body—and each consists of just five poses that take one to two minutes each to complete.
I alternate between the upper and lower body routines on a daily basis, but started with just the lower body one because I wanted to address that first. Once things below the belt had noticeably improved, I began alternating with the upper body routine.
Enjoy!
My Lower Body Yoga Routine for Better and Safer Weightlifting
Here are my five favorite lower body yoga poses for improving leg, hip, ankle, and lower back mobility and flexibility.
I do all five of these poses in the following order:
- Reclined Thunderbolt Pose (Supta Vajrasana)
- One-Leg Reclined Thunderbolt Pose (Supta Vajrasana)
- Pigeon Pose (Kapotasana)
- Eye of the Needle Pose (Sucirandhrasana)
- Half Lord of the Fishes Pose (Ardha Matsyendrāsana)
1. Reclined Thunderbolt Pose (Supta Vajrasana)
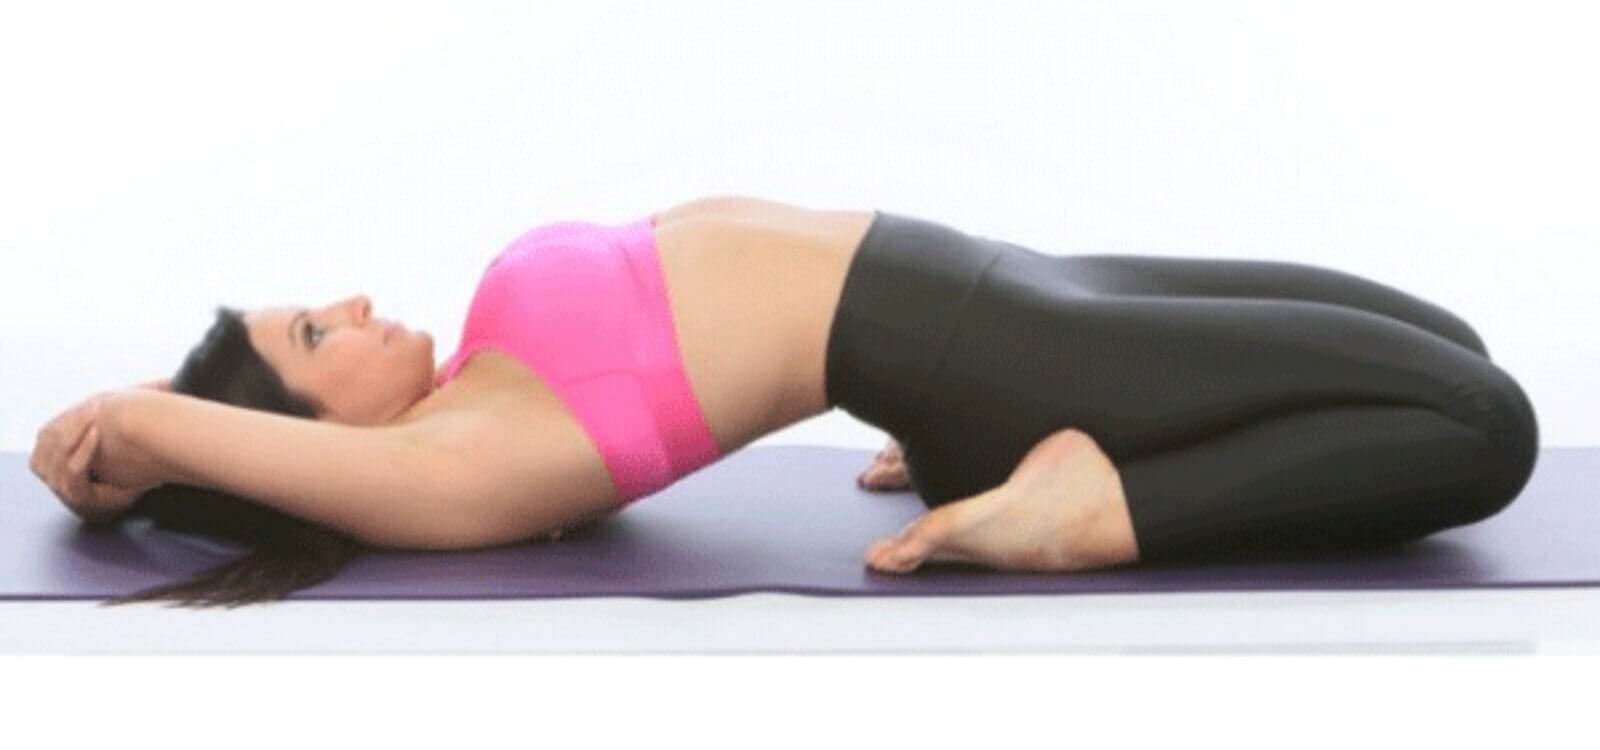
I hated this pose at first because I sucked at it.
It was actually embarrassing how little mobility I had in my hips, thighs, and right ankle (which I sprained pretty badly years ago playing paintball).
After several months of doing it, however, I saw fantastic increases in range of motion that were particularly helpful in my squatting.
Here’s how to do it:
- Sit on your knees with your feet under your butt on a comfortable surface.
- Spread your knees and feet enough that your butt can fit between them.
- Rest both hands on the ground on either side of you, and slowly lean backward.
- Lean as far backward as you can without pain, then hold this position for 5 to 10 deep breaths, or 30 to 60 seconds.
- Try to keep your back and neck more or less straight.
- If you’re flexible enough, lean all the way back so that your head is resting on the ground behind you.
2. One-Leg Reclined Thunderbolt Pose (Supta Vajrasana)
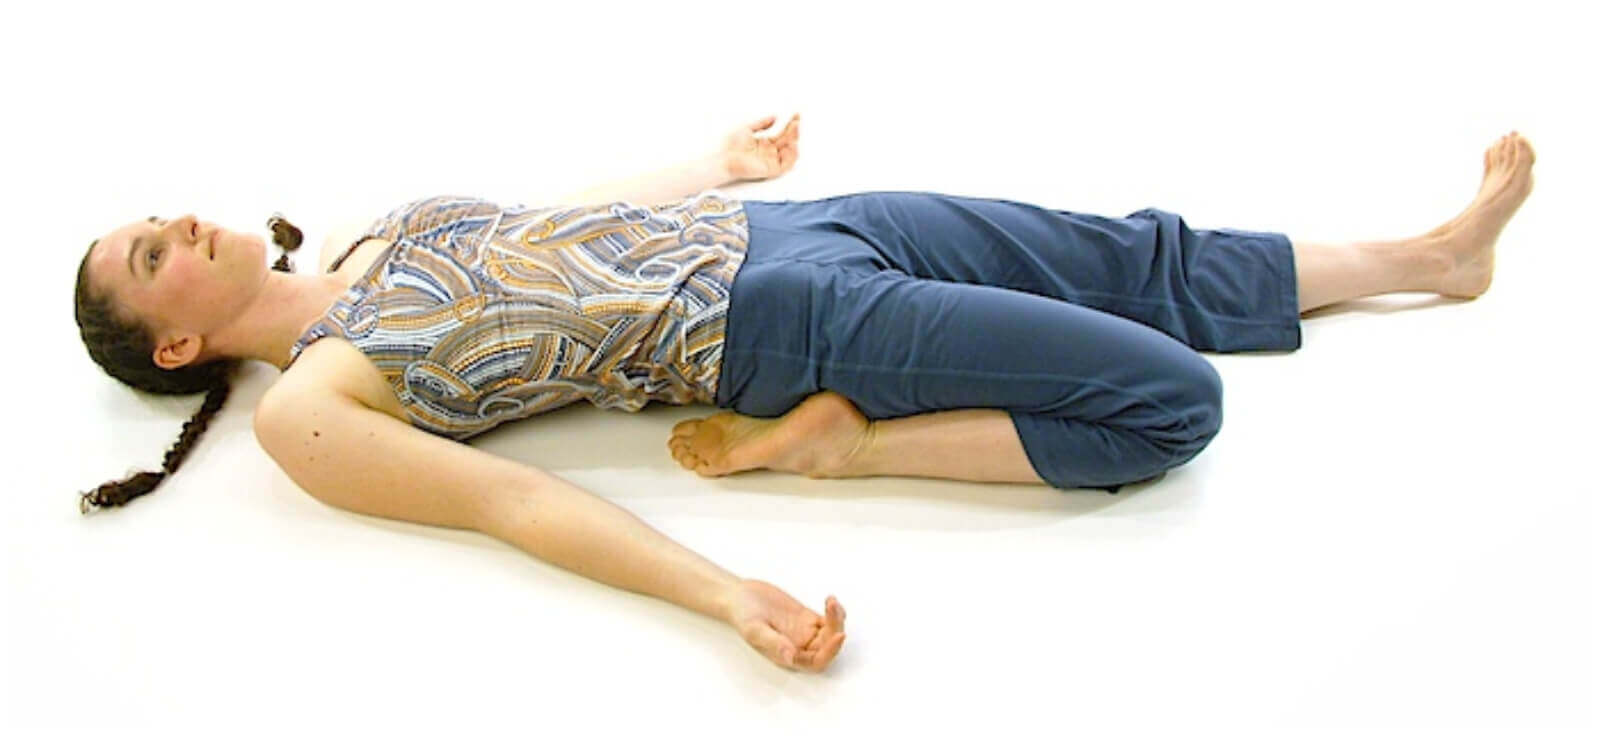
This pose helped me get to the point where I could perform the Reclined Thunderbolt Pose properly, and I still do both because this allows for a deeper stretch.
Here’s how to do it:
- Sit on your knees with your feet under your butt on a comfortable surface.
- Extend your left leg out in front of you.
- Spread your right knee and foot slightly out to the right.
- Rest both hands on the ground on either side of you, and slowly lean backward.
- Lean as far backward as you can without pain, then hold this position for 5 to 10 deep breaths (30 to 60 seconds).
- Try to keep your back and neck more or less straight.
- If you’re flexible enough, lean all the way back so that your head is resting on the ground behind you.
- Switch legs and repeat.
3. Pigeon Pose (Kapotasana)
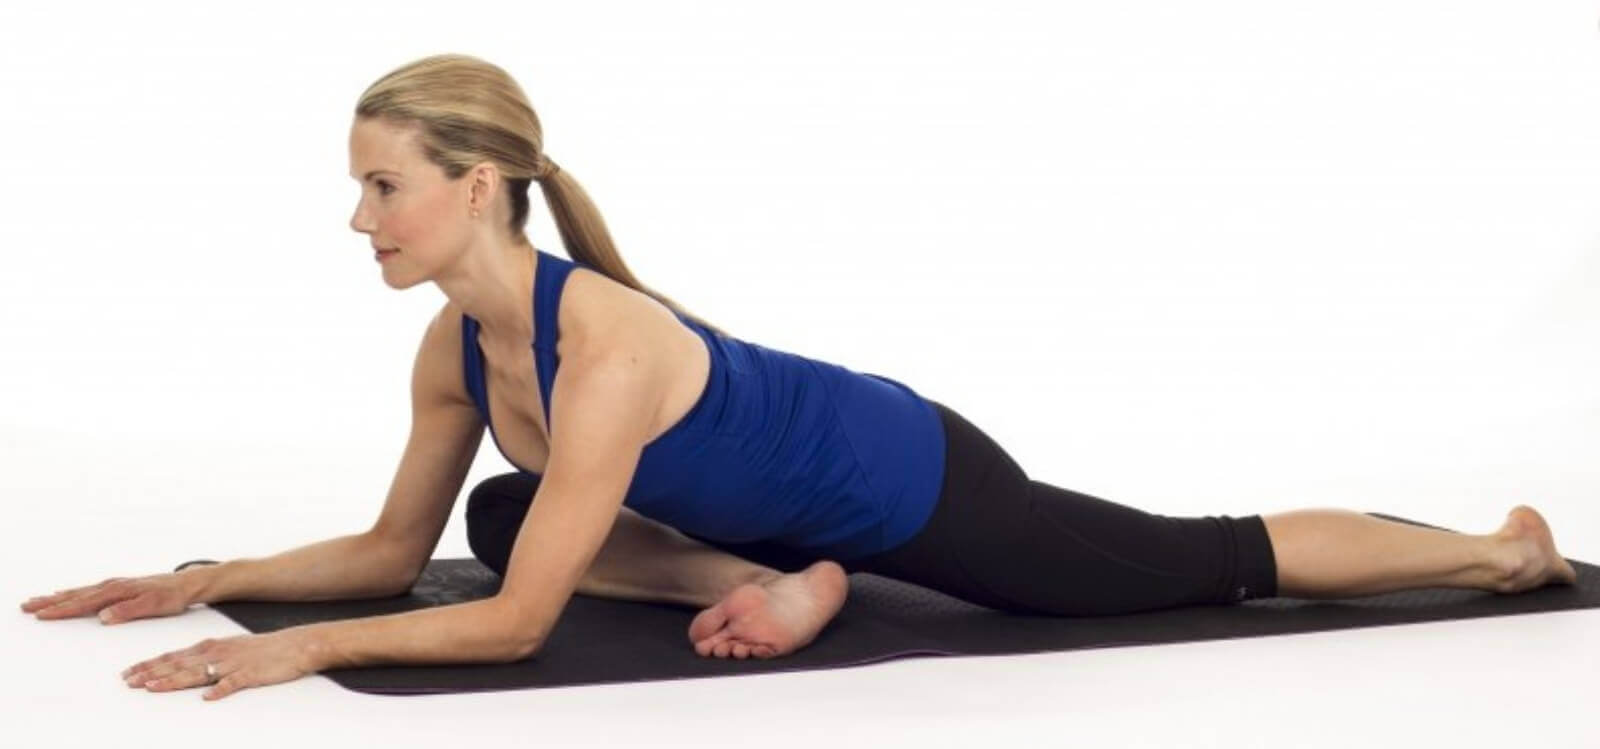
This pose worked wonders for me because it really “opens up” the muscles on the outside of your thighs and hips (the hip abductors), which tend to get really tight from lower body training.
I also found that the right side of my hips had a lot less external rotation available to them than my left. This is still slightly the case, but it’s far less now than when I started doing this pose regularly.
Here’s how to do it:
- Sit on your knees on the floor.
- Extend your right foot in front of your body and toward your left shoulder.
- Stretch your left leg out behind you, either with your toes on the ground or with the top of your foot resting on the floor.
- Place your hands on the ground in front of you, and keeping your back straight, lean forward as far as you can without pain.
- Try to keep your hips more or less aligned (not letting your right or left hip shift ahead or behind of the other one).
- Hold this position for 5 to 10 deep breaths (30 to 60 seconds).
- Switch legs and repeat.
4. Eye of the Needle Pose (Sucirandhrasana)
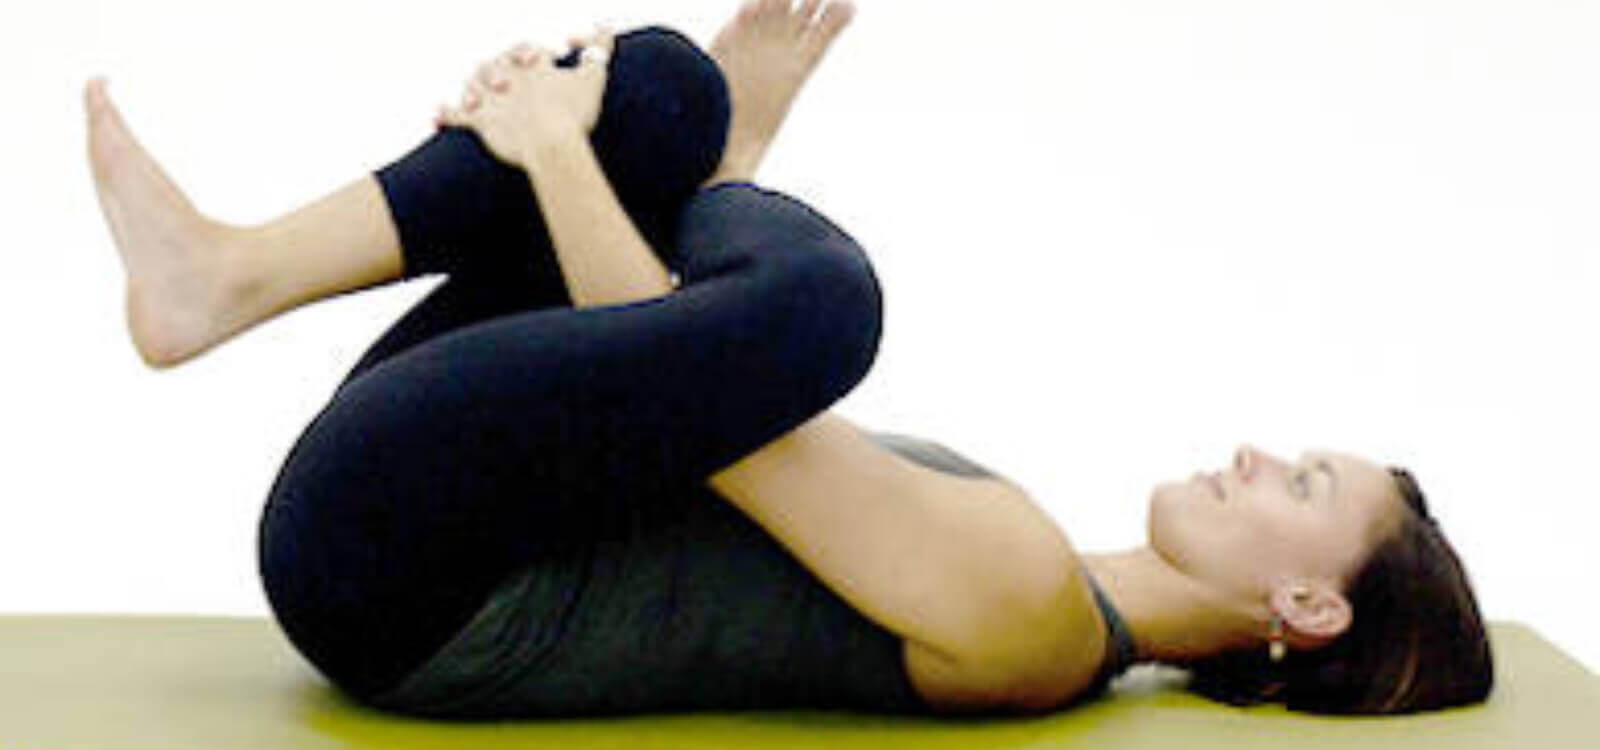
This pose has a similar effect to the last, helping loosen the glutes, low-back, and outside of the hips.
Here’s how to do it:
- Lie on your back with both legs straight out in front of you.
- Place your left foot on your right thigh, just above the knee.
- Grab your right thigh by reaching your left arm through the hole created by your legs and wrapping your right arm around the side of your right thigh, and pull it toward your chest. Keep your back relatively straight.
- Hold this position for 5 to 10 deep breaths (30 to 60 seconds).
- Switch legs and repeat.
5. Half Lord of the Fishes Pose (Ardha Matsyendrāsana)
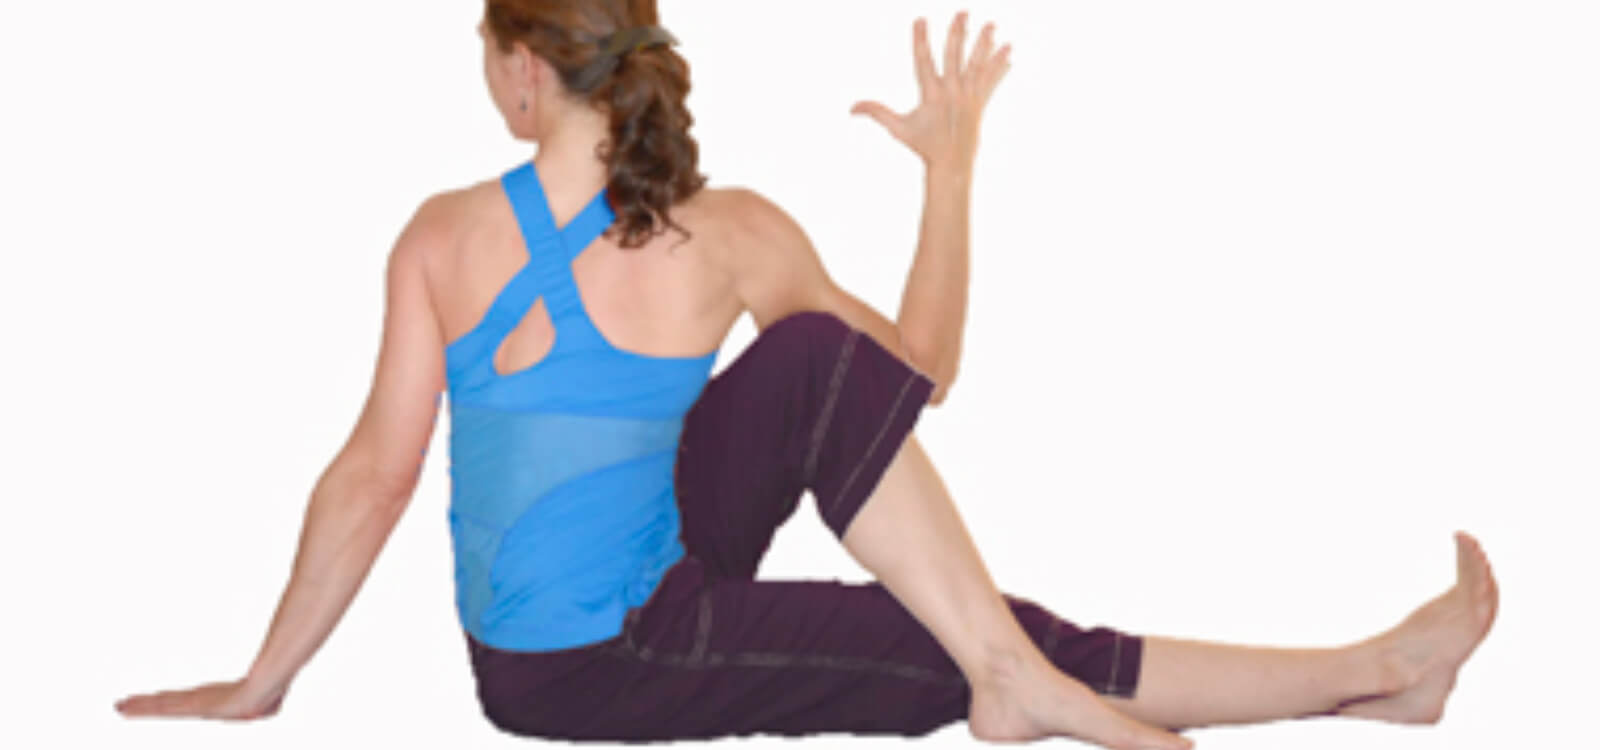
I mentioned early that my left SI joint was being finicky, and this pose really helped work out the kinks. It also helps loosen my upper back.
The regular Marichi’s pose doesn’t involve crossing your legs, but I find that gives me a better stretch.
Here’s how to do it:
- Sit on the ground with both legs stretched out in front of you.
- Plant your left foot on the outside of your right leg, as close to your hips as you can.
- Place your right elbow on the left side of your left knee, and place your left hand on the ground behind you.
- Keeping your spine straight, twist your torso by pushing your right elbow against your left knee.
- Hold this position for 5 to 10 deep breaths (30 to 60 seconds).
- Switch legs and repeat.
My Upper Body Yoga Routine for Better and Safer Weightlifting
As I mentioned above, once I had seen marked improvements in my lower body mobility and flexibility, I began alternating between upper and lower body routines.
For my upper body work, I chose poses that target the shoulders, neck, and upper back because those are the areas that get beat up the most in the gym.
Here are the five poses I do (and in the following order):
- Reverse Table Pose (Ardha Purvottanasana)
- Thread the Needle (Parsva Balasana)
- Eagle Arms (Garudasana)
- Cobra Pose (Bhujangasana)
- Child’s Pose (Balasana)
1. Reverse Table Pose (Ardha Purvottanasana)
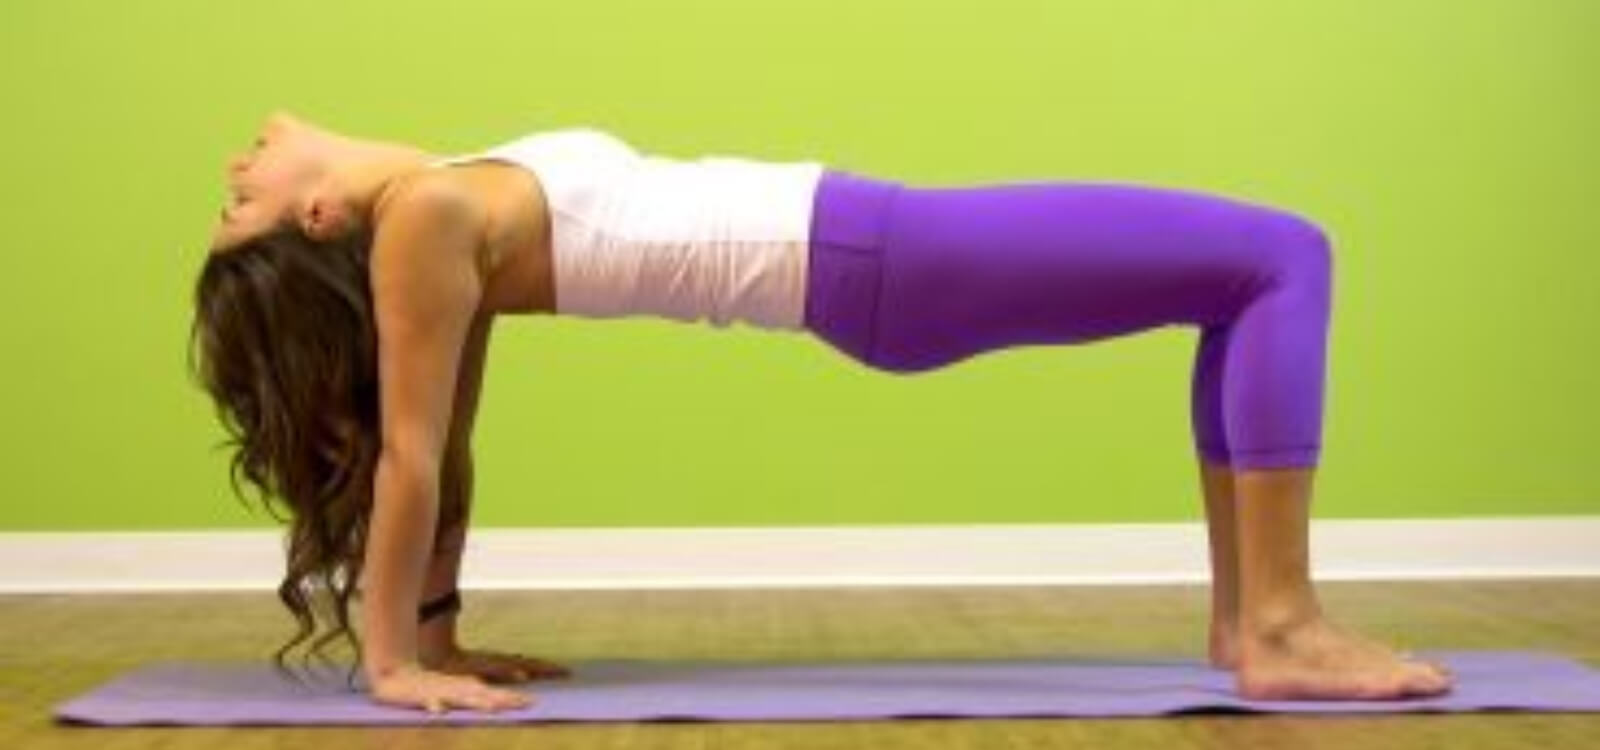
A very common problem among weightlifters—well, everyone these days, really—is too much internal shoulder rotation.
Internal shoulder rotation involves the shoulder joint slouching forward and down toward the inside of your chest, like this:
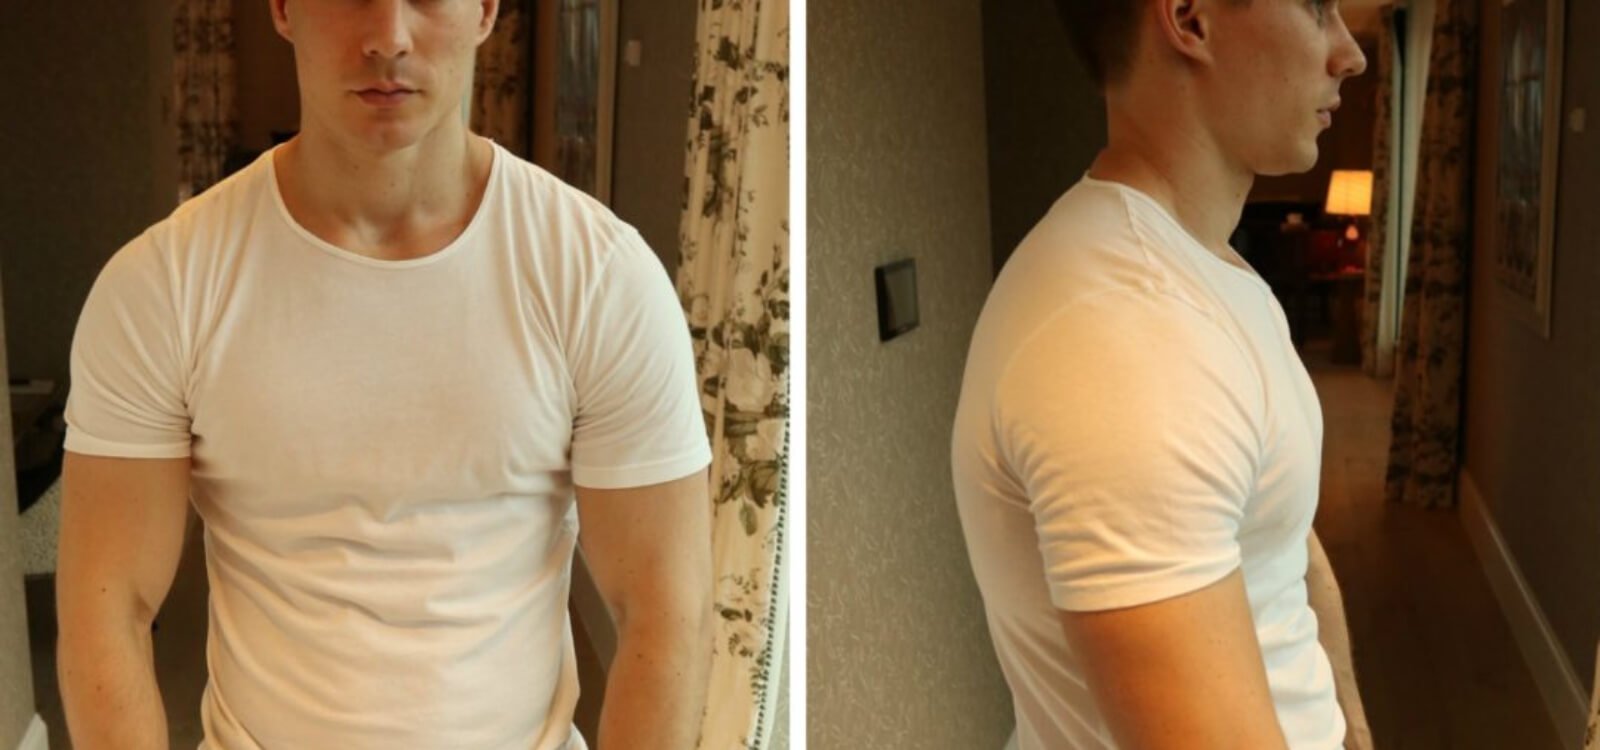
I wasn’t too bad in this regard, but definitely had room for improvement, and this pose really made a difference.
Here’s how to do it:
- Start seated on your butt with your feet resting on the ground in front of you and your palms resting on the ground behind you, either pointed toward your feet or out to the sides.
- Pushing into the ground with your feet and hands, raise your hips toward the ceiling until your back is parallel with the ground.
- Hold this position for 5 to 10 deep breaths (30 to 60 seconds).
- You can either let your head drop down toward the ground behind you or stair straight ahead at the ceiling.
2. Thread the Needle (Parsva Balasana)
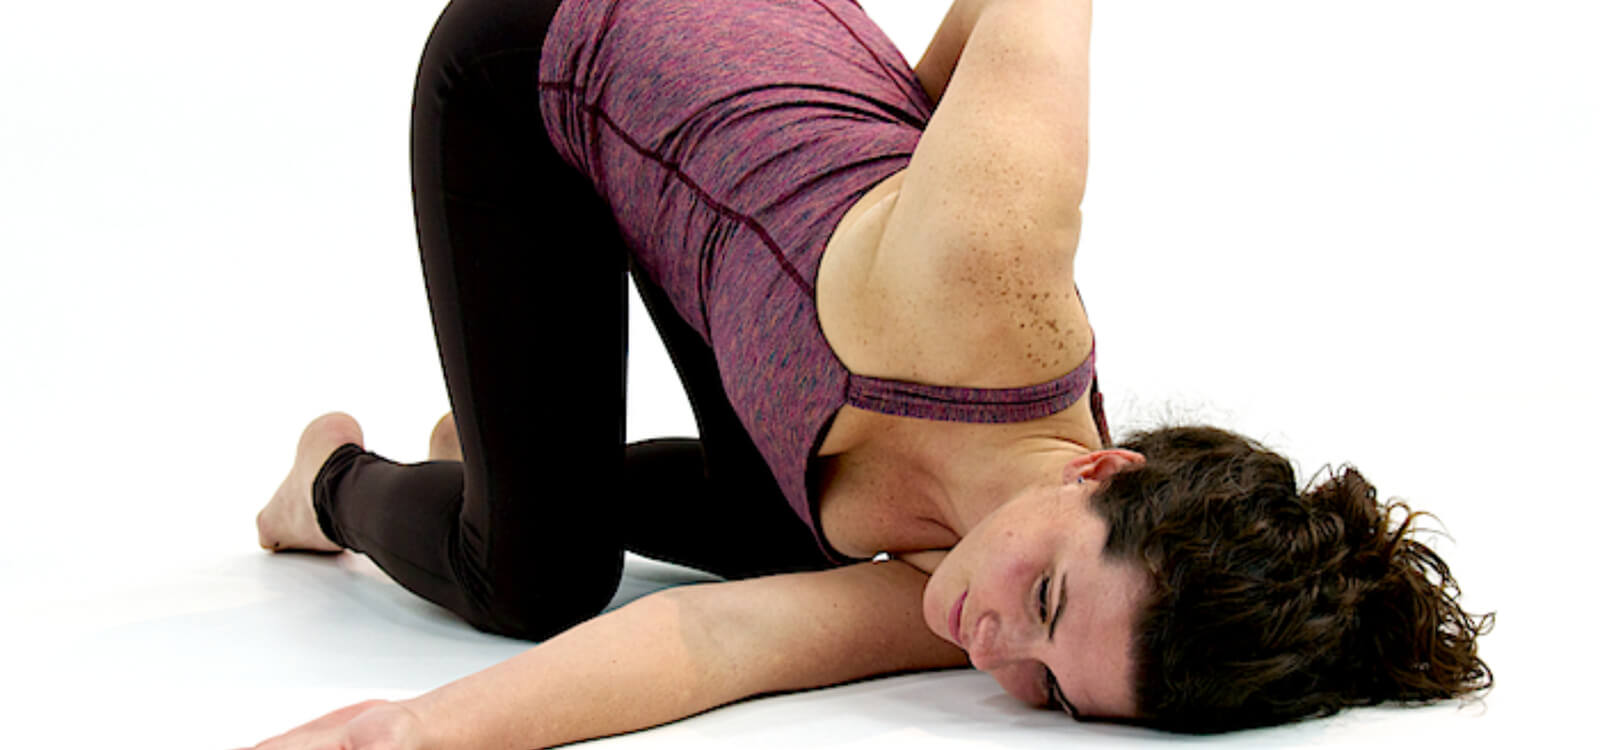
My right shoulder and the right side of my upper back was always tight and in need of assistance. This pose has helped tremendously.
Here’s how to do it:
- Start on all fours on the floor.
- Move your right hand underneath your left arm while simultaneously bringing your right shoulder toward the ground.
- Rest your right shoulder on the ground, with your right hand extended perpendicular to the left side of your body and your palm facing the ceiling.
- Turn your head so you’re looking toward your right hand.
- Place your left hand so the back of your fingers are resting on your lower back.
- Hold this position for 5 to 10 deep breaths (30 to 60 seconds).
- Switch sides and repeat.
3. Eagle Arms (Garudasana)
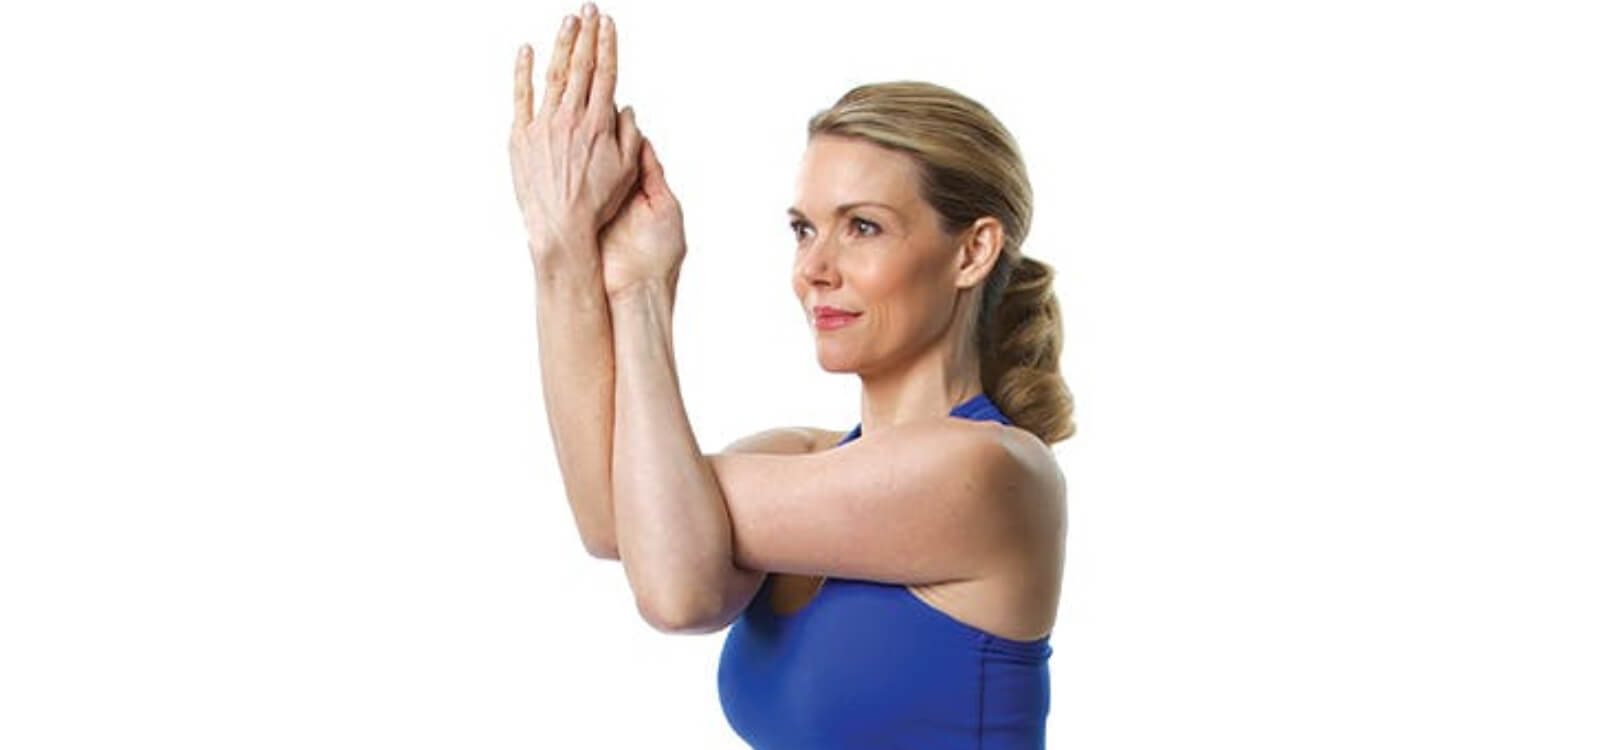
If you do a lot of pressing (bench and overhead), your deltoids and rotator cuff muscles can never get enough love. This pose will make a difference.
Here’s how to do it:
- Start by standing or sitting. (You can also do this balancing on one foot, but I prefer standing in a comfortable position).
- Straighten both arms out in front of you.
- Move your left arm under your right.
- Keeping your left arm under your right, bend both elbows.
- Try to press your palms together (or the back of your hands if you aren’t flexible enough to touch your palms).
- Raise your hands toward the ceiling and push your shoulder blades toward the floor.
- Hold your right arm at a right angle to your torso, with your right hand pointed toward the ceiling.
- Hold this position for 5 to 10 deep breaths (30 to 60 seconds).
- Switch arms and repeat.
4. Cobra Pose (Bhujangasana)
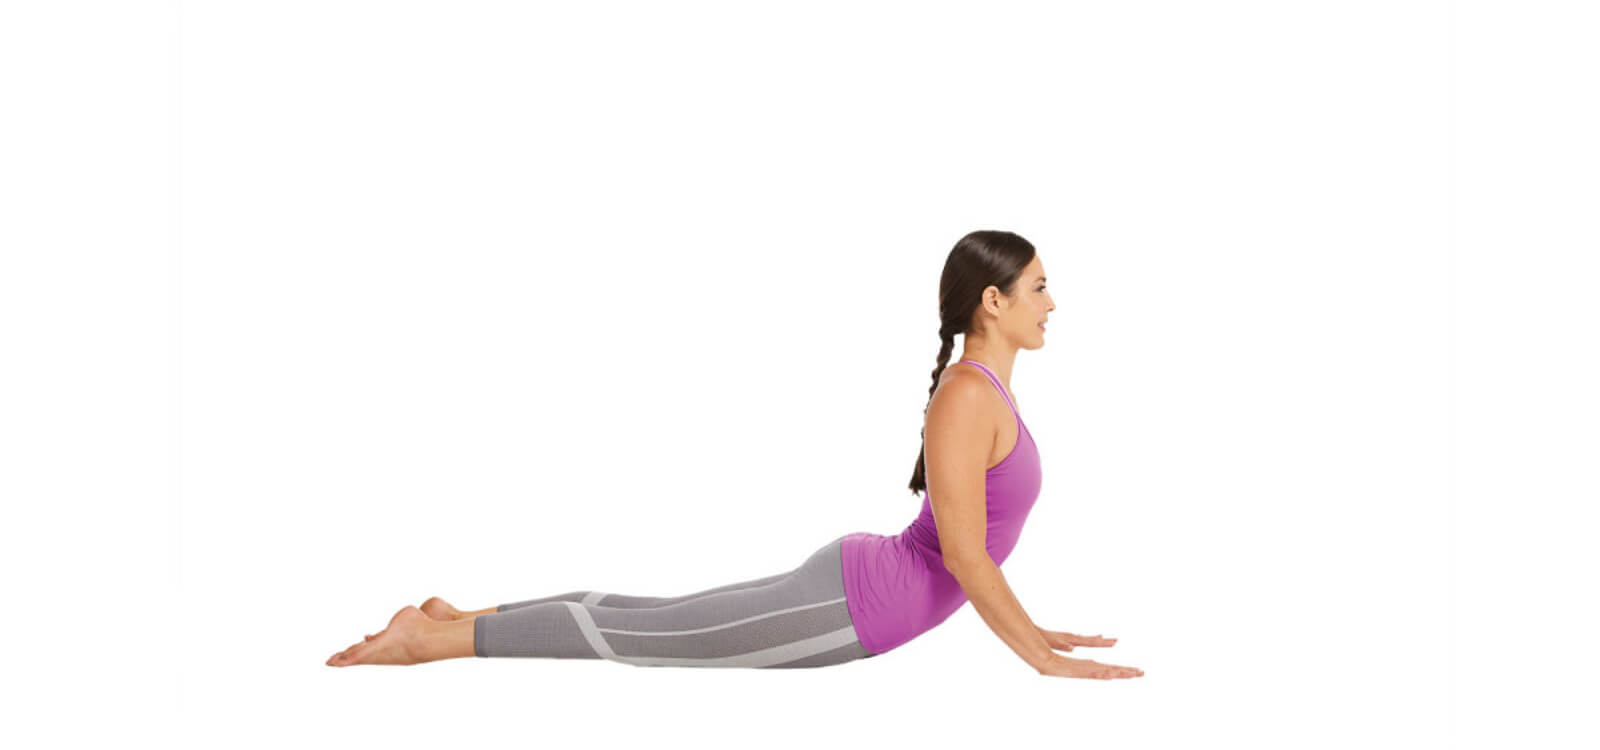
This is a simple pose that stretches out your lower back, chest, shoulders, and hip flexors.
Here’s how to do it:
- Lie face down on the floor with both legs extended straight behind you.
- Place both palms on the floor on either side of your chest as if you were about to do a pushup.
- Extend both arms to push your torso off of the ground while pressing the top of your feet, thighs, and hips into the floor.
- Push your torso as high as you can while keeping your hips on the ground.
- Hold this position for 5 to 10 deep breaths (30 to 60 seconds).
5. Child’s Pose (Balasana)
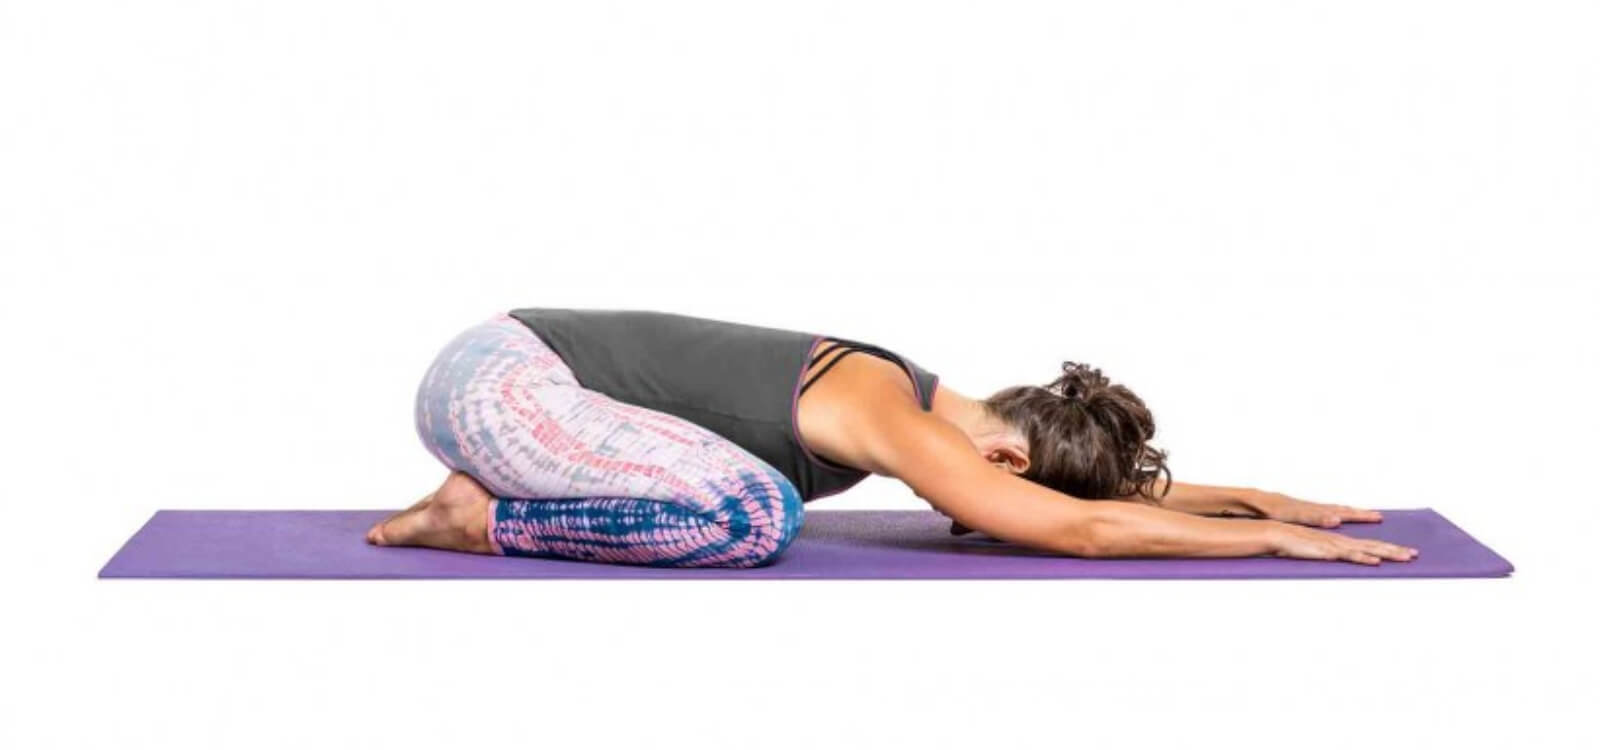
This pose doesn’t look like much, but it provides an excellent shoulder stretch and mimics the position required in the overhead press.
Here’s how to do it:
- Sit on your heels with your hands in front of you.
- Spread your knees apart while keeping your big toes touching (or close to touching) and your butt resting on your heels.
- Sit up straight and raise your chest to the ceiling.
- Lower your upper body to the floor, extending your hands out in front of you as far as you can until your head touches the floor.
- Push your hands into the floor, keeping your butt over your heels.
- Hold this position for 5 to 10 deep breaths (30 to 60 seconds).
The Bottom Line on My Yoga Routine
Lifting weights is one of the healthiest activities you can do.
It protects against joint pain, strengthens bones, ligaments, and tendons, and, of course, makes your muscles bigger, stronger, and healthier.
The downside is that it also puts a lot of stress on your body.
That’s why I’ve made basic bodily maintenance like stretching, mobility exercises, and yoga poses a priority. I want to be able to keep lifting weights into my 40s, 50s, 60s, and beyond, which is why I started yoga.
It seemed like an easy way to mitigate a lot of the tightness and discomfort that was getting in the way of my progress in my workouts.
I was surprised at how well it worked, and so I turned my favorite poses into simple 10-minute routines that I can do every day. And things have only gotten better.
My squatting, deadlifting, and pressing are much more comfortable, I rarely have joint aches or pains, and my muscles feel looser, and especially on my right side, which was always noticeably tighter than my left.
Here’s my lower body routine again:
- Reclined Thunderbolt Pose (Supta Vajrasana)
- One-Leg Reclined Thunderbolt Pose (Supta Vajrasana)
- Pigeon Pose (Kapotasana)
- Eye of the Needle Pose (Sucirandhrasana)
- Half Lord of the Fishes Pose (Ardha Matsyendrāsana)
And here’s the upper body routine:
- Reverse Table Pose (Ardha Purvottanasana)
- Thread the Needle (Parsva Balasana)
- Eagle Arms (Garudasana)
- Cobra Pose (Bhujangasana)
- Child’s Pose (Balasana)
If your lower body is much tighter than your upper body, or vice versa, start doing that routine every day until you see a clear improvement. Then, start alternating between the two.
Let me know how it goes!
